This project is to make a device to record the sounds made by birds. It is the result of a conversation with local university professors. The main requirements that have been captured so far are:
Information that is still required to be clarified:
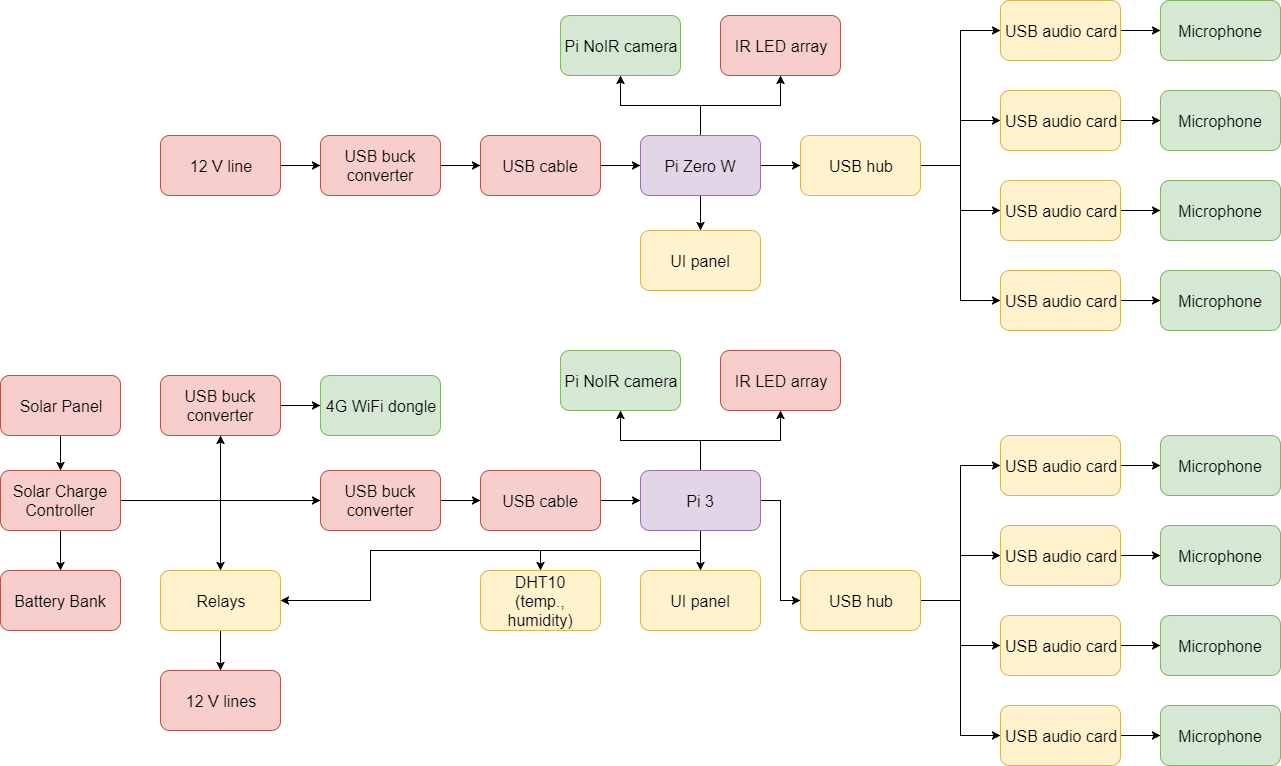
So far, the intention is to use a Raspberry Pi Zero to record through multiple microphones. The power source might be a 7 Ah SLA battery, perhaps being supplemented by a solar charging system if required. The RPi apparently draws around 80 mA (according to this blog post, meaning that around 3.5 days of power are possible off a 7 Ah SLA, though around 5.5 might be possible with a buck converter. Therefore, energy harvesting will be required. I will need to complete the testing of the solar trickle charing being used for the Water Node.
The bird sounds will need to be recorded to a storage device of some kind, perhaps an SD card would be appropriate. A quick calculation from this audio file size calculator shows that 720 hours of CD quality mono audio would use around 229 GB of storage, so this is therefore not feasible. If sound exists for 1-10% of the time, then a 30 GB storage device would be suitable, which is feasible. This especially becomes a problem once multiple channels are introduced. It looks like SoX can help solve this problem, but I'm still probably going to run into problems with audio drivers. The first test will be to try to record any sound with a USB audio device.
I also need to check if the client would find any other types of data useful: I might as well collect it all at the same time.
Next actions:
The requirements were clarified with the client, and can be found on the project management page.
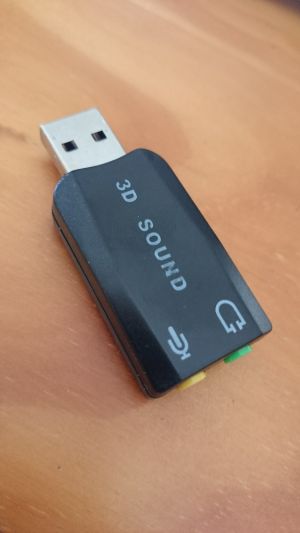
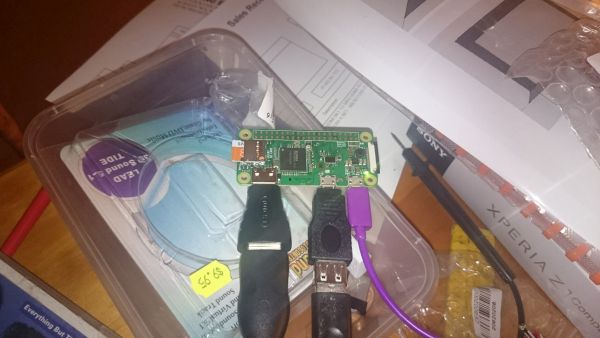
I also bought a $9.95 USB to 3.5mm adapter for testing. This, connected to a microphone, should let me record audio on a Raspberry Pi.
I finally managed to get the microphone working with the USB adapter on my Windows PC. Only took an hour... Then I booted the RPi to check for life. No problems there. Then I tried following the tutorial here to get a USB audio device working. Firstly, it recognised the device when running the command lsusb as "C-Media Electronics, Inc. CM108 Audio Controller". This website told me that this means I need to follow other instructions for the CM108. So, just to be safe, I updated all the firmware:
sudo apt-get update

sudo apt-get upgrade
It downloaded 300 MB of updates, showed me a changelog, and then kept doing it's thing. The whole process took around an hour. After it had completed, I rebooted with sudeo reboot.
The command cat /etc/os-release told me that the release of Raspbian this RPi is running is "Jessie", which will have an effect on the rest of the install process. I'll make some more progress tomorrow, its much too late. I sent an email to the client to check if any other data would be useful to collect.
Next actions:
Then I followed Jorg's advice in this forum, but this didn't work. So, I tried setting ~/.asoundrc with the same parameters as specified by one of the answers in this forum post, (card 1) and I've got sound coming out the speakers! So, now that the card is working, I tried recording audio with arecord --device=hw:1,0 --format S16_LE --rate 44100 -c1 test.wav -V mono, and it worked too! I could also play back the audio with aplay --device=plughw:1,0 test.wav. The volume was a little low though. Rather than transfer using USB, I connected via FTP and listened to the file on my PC. The volume seemed OK, and I get the feeling that this can be boosted in post production. I also found that alsamixer was able to boost the microphone gain and it stayed the same after a reboot. I just cranked all the volumes up to 100, it seemed to help a bit, though 50 volume is pretty much the max when conducting white noise testing with speaker-test -c2.
So, I suppose the next step in software would be to install SoX and give it a go.
The client also requested 3 optional requirements: record temperature, record humidity, record light levels, and capture images with the camera. The first 3 could be achieved with an Arduino, or even SPI/I2C from the Pi, the last depends very much on the hardware of the camera. I've suggested that we buy an adapter for the camera to connect it to the Pi Zero.
It's also probably getting close to time to move to the Pi Zero. I'm trying to work out if this should be done sooner or later, since testing is so much easier on the Pi. But maybe it will be nicer over WiFi. I might leave it for the moment, and focus on getting one to work.
I charged an SLA with my solar charger from the Water Node. 4 panels in series, wuth an LM317 adjusted with 470 Ohm / 4.7 kOhm + 330 Ohm, and a 0.7 V diode to give a measured output voltage of around 13.97 V. The SLA started at 12.45 V, and after half an hour it had reached 12.87 V. After cooling the battery for an hour, the final voltage was 12.58 V. According to Figure 5 in the Power-Sonic SLA Technical Manual, which shows a gradient of approximately 14.1 mV/%, this would imply a charge of approximately 9% (0.65 Ah Ah) in 30 minutes. That implies 7.8 Wh in 0.5 hours, which is not possible given that each panel can only generate around 1 W. The only way to find out will be to field test this with a constant 100 mA load. A constant 88 mA load can be simulated using an LM317 and 2 x 6.8 Ohm resistors. But, I've just realised that this is pointless, since the solar panels create a max of 100 mA to begin with, there's just no way these numbers stack up in a reasonable way. Time to increase the collection capacity of the solar panels.
The Nomad 7 solar charger I have borrowed claims that it can charge 4 x 2000 mAh 1.2 V cells in 3 hours of "good sunlight". This means 9.6 Wh in 3 hours. I can probably assume 3 hours of "good sunlight" on an average day in the town that it needs to work at this time of year. But, I'll need at least 9.6 Wh (wierd fluke, I promise) per day to power the Pi for 24 hours. This puts me way too close to the critical numbers, and no allowance has been made for charging/discharging efficiency etc.
The 40 W solar panel I have will definitely be powerful enough. I can use it with my 12 V charger from eBay, and then simply power the RPi with a 5 V regulator. Problem solved. It just neeed a bit of money thrown at it: a 40 W solar panel costs around $50, and the CMTP02 solar charger is around $15. The regulator is all but free. I will consider the power problems solved, though a field test will be necessary.
An idea of the total time required so far has been around 3 hours of design.
I'm going to choose MP3 as the file type, since it's compatible with everything, and has fairly good compression. So, to install SoX, I need to run:
sudo apt-get install sox libsox-fmt-mp3
I could then test it was working properly with:
sox -t alsa plughw:1 -d
which replays the audio from the microphone with a very short delay.
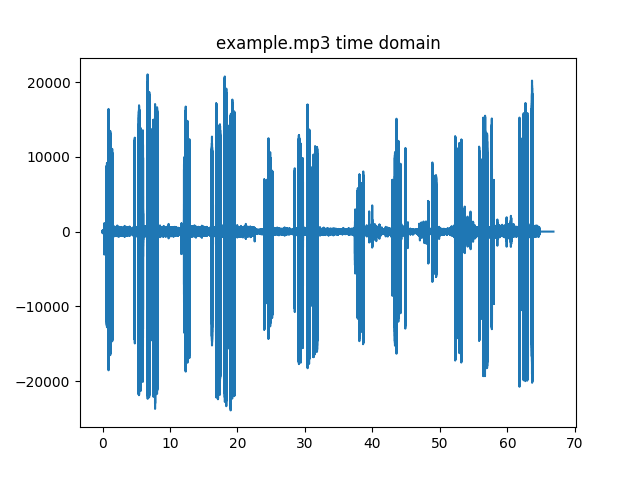
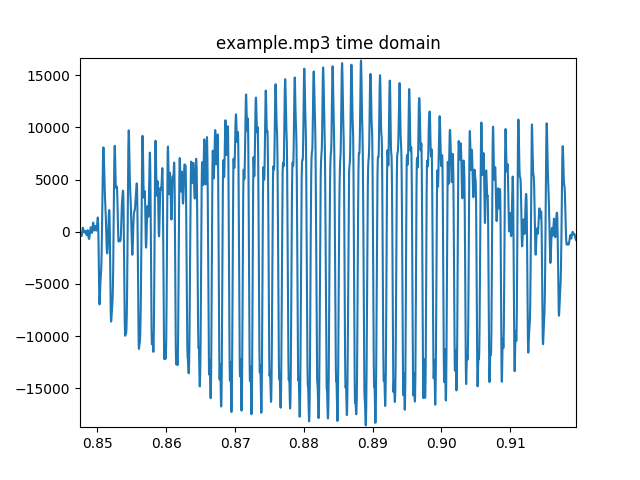
I've been thinking about the best way to tackle this problem. I think that I might end up recording all the audio, and then removing noise in post processing. This ensures that no information is lost by accident. I did some tests with different bit rates, and the file sizes are definitely linear with bit rate. MP3 is definitely the best bet in terms of file size (I think that a month long audio file might be in the order of 20 GB). Here is an example of such a command:
sox -d test.mp3 -r 44100 -b 16 trim 0 01:00
This records the default (set earlier by modifying ~/.asoundrc) input microphone (-d), and saving to the output 'test.mp3' with a rate of 44100 Hz, with 16 bit resolution, trimming all but the first minute of audio (just recording for 1 minute seconds and then exiting). There are many other commands available which an be used in series as part of a 'chain', but that can be learned by reading the documentation for SoX.
Now I was interested in processing the file in Python. I would usually use MATLAB for this kind of thing, but I wanted it to be as acessible as possible. The next step will be thinking about how to process this audio. I think that a discrete fast fourier transform will help reveal noise which can be removed to improve the audio quality. Or, I could use the inbuilt functions in SoX to remove noise. I'm tempted to do the whole thing in SoX, which is technically possible (I think), though I'll have to make sure to validate the processes I'm performing by analysing them with external software and looking at the mathematical properties of the sound as a digital signal. If I start with some test audio containing some useful signal, as well as noise, I can practice with that.
Next actions:
It looks like after connecting to the GPIO, it's easy to use I2C and SPI etc (GPIO/PWM/Serial is also possible, which might be useful for indicators). If I choose the peripheral devices carefully, I might be able to find fully functional libraries to use. Notably, there isn't an inbuilt ADC, so the light levels might be out of the question for the time being, without buying an external ADC.
In terms of assembly, there may be a trade-off between design efficiency and construction difficulty. One of the benefits of the Pi, as opposed to the Pi Zero, is that the GPIO are all male headers, which are east to connect to with Dupont jumper cables. It's also possible that this first design affords the use of a higher power consumption system, since the solar panels are so large. If there were no sunlight at all, a 7 Ah SLA could power a Pi for around 35 hours best case. I'm going to have to perform some tests to know for sure.
Today was another 30 minutes of work, up to 3.5 hours of design.
Next actions:
After a false start with the solar testing (when the little SOT22 5V regulator onboard the Arduino Nano burned out), I've sent out a slightly more robust model. I'll leave it out for a few days, until I'm satisfied by the robustness of the system. When the test is done, opefully I'll be able to gather some decent information by parsing the data about the voltage of the SLA. I can't remember the results of my last test exactly, but I seem to remember that a 5 W load could be supported by a poorly set solar panel for a couple of days before crashing.
I booted up the Pi Zero, I really like it so far. Very easy to download and install the image with Win32DiskImager. Couldn't seem to get rid of the overscan, but that isn't really a problem. The keyboard layout WAS a problem, but I jut switched locales and tld it I was using a Logitech in raspi-config. Then I was able to enable the WiFI by following these instructions and then rebooting. It mgiht have helped that I set the locale to AU for WiFi. Then I was able to update, and upgrade. Auto login could be set up in raspi-config also. For some reason I also had to enable to SSH server. To find the IP of the Pi, use ifconfig. Also, it helps to expand the file system (well, it will help later). Then, I was able to set up a hotspot on my phone, connect to it with both the Pi and my PC, and transfer files between them! Next, I checked that I could reboot, then wait a bit, then turn on the hotspot, and see if the Pi automatically connected: it does! It seems to take about a minute though. The file transfer rate appears to be around 1.9 MB/s, with a 1.8 GB file taking around 16 minutes to transfer. I also tried connecting directly with AndFTP for Android, with great success. You just have to be careful to us SFTP (SSH FTP) rather than FTP or FTPS (FTP SSL). Confusing.
Today was another 2 hours of work, up to 5.5 hours of design.
Next actions:
Since I'm going to need the USB for audio, and not a keyboard, I thought it would be prudent to learn to use crontab again (however, I just realised that this is not necessary since I can SSH). I found the following to be really handy as a test: "*/2 * * * * echo "Hello World", and the I run tail -f on my log file (/var/log/syslogon debian)."
It was a different set up to get the sound card working this time. I had to create the ~/.asoundrc file, and I entered in the usual parameters according to my work above. Fixed - the USB audio is now the default device.
So, now it seems appropriate to install SoX. No problems. A better audio test at this point is:
sox -d -d
which records the default input and plays back to the default output. Easier to type, and tests that your audio is configured correctly.
I recorded a test.wav audio file.
I also checked on the solar battery test. It has taken 13.6 hours or readings since midnight last night, so I'd say it was working. I'll analyse the data properly this evening, though a first glance seems to show that the battery has plenty of extra capacity (as expected).
I wrote a short bash script to record audio and save to files, and ran it every minute with crontab. Success! I might do these hourly though. Time to start playing with the audio quality. 1 GiB per month = 386 B/s. So, I'm going to want to be around the 1-10 kB/s range (2.6 to 26 GB total). I'm going to try to sample an MP3 at the lowest possible rate in 1 hour files (subtracting a second to avoid some weird error relating to SoX not enjoying the process of recording two files simultaneously) and prove that the audio is good enough, and that the files are small enough. It will also test the code, which I'll upload another day, but I promise it's very easy.
I don't think the status LED is going to be necessary, so I'm going to can it for the moment.
Today was another 1 hour of work, up to 6.5 hours of design.
Next actions:
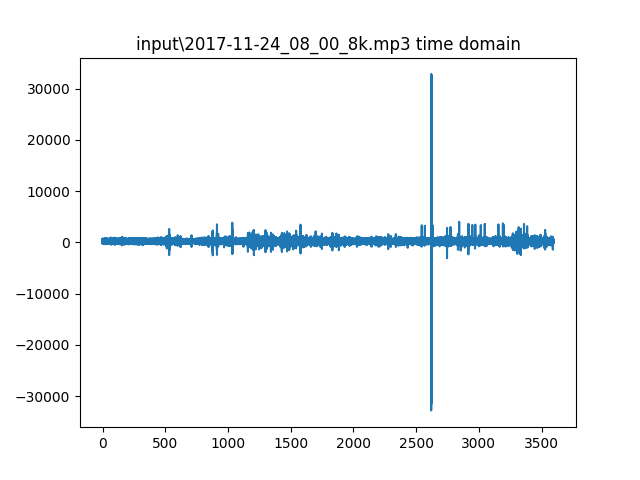
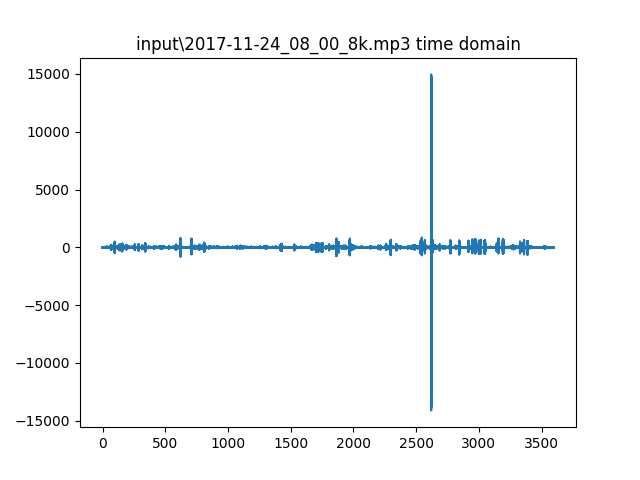
There was some annoying audio clicking at 8000 Hz recording rate, so I'm going to try increasing that to 16000 Hz. That should put me at around 5 GB for the month.
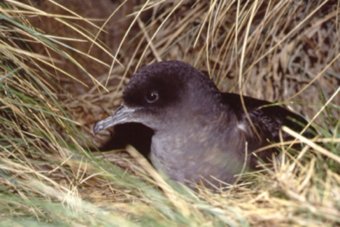
I had a quick check of the spectrum with this tool, and I remembered some of the university teachings: the Nyqist frequency of a signal is less than half the sampling frequency. So, sampling at 8000 Hz gives me a maximum recording frequency of 4 kHz. This might be too low for recording muttonbirds. So, I downloaded some audio of muttonbirds from here, and checked the spectrum.
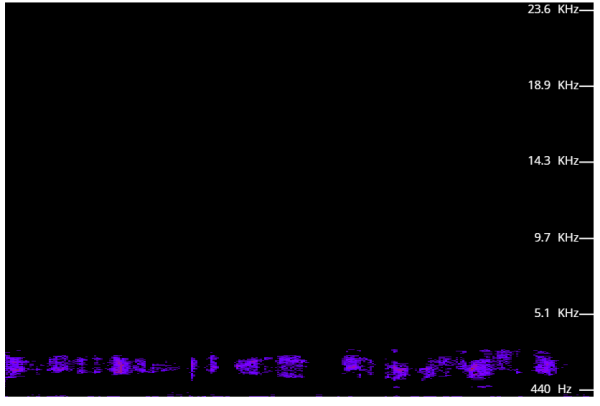
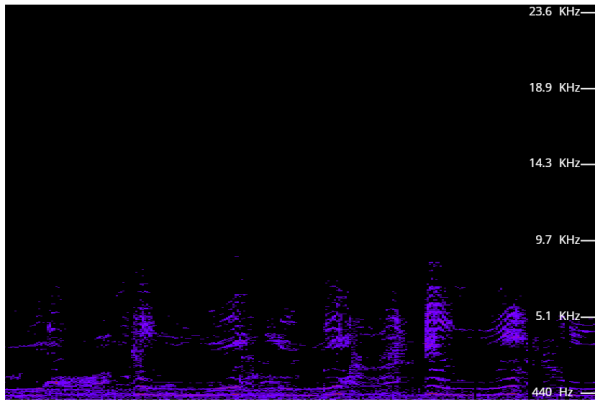
Based on this, a recording rate of 16 kHz seems like an appropriate compromise. I think that enough information will be present in the lower harmonics in order to clearly hear the nature of the call. However, on SoX, this seems to correspond to a bit rate of around 24 k. So I'm going to need at least a 16 GB SD card.
For convenience, I decided to install scipy from the .whl, and then upgrade my existing installation of numpy (also from the .whl. 64 bit versions of windows don't like to play nicely). I ended up installing everything successfully and then running the code from here as a test. Undfortunately, the 110 MB .wav file looks like it might be a little too big to really do this properly for. However, some hacky code which adds the spectrograph data for each time value seems to be working OK, giving something like the following:
This level of audio analysis is sufficient for the time being. So, now I'm just waiting for nightfall to retrieve the solar battery data.
Meanwhile, I thought I'd produce a budget for the build:
| Item | Value ($AUD 2107) |
|---|---|
| 40W solar panel | 46.95 online |
| Charge controller | 8.56 online |
| 7 Ah 12 V SLA battery | 21.95 online |
| Buck converter | 1.00 online |
| LM7805 5 V linear regulator | 1.42 from E14 |
| USB micro cable | 1.70 online |
| Raspberry Pi Zero W | 17.96 (including shipping) |
| micro USB male to USB type B female OTG adapter | 7.95 (1.00 online) |
| Mini HDMI to HDMI adapter | 9.95 (2.10 online) |
| 16 GB microSD card | ?? (6.29 online) |
| 3D Sound USB audio converter | 9.95 (1.00 online) |
| Microphone | 1.65 online |
| Box | ?? |
So, the total cost for this client is $113.38 (they will provide their own battery), but the price for a system bought online would be $111.58, including the battery. Still unknown are the prices for the container itself, and the SD card (since the SD card might be provided). To save the client some money though, I reviewed the 8 kB/s sound file as a recording of shearwater calls, and it was actually fine and interpretable. So, the only hardware remaining is the container, but I plan to use a lunchbox.
I'm just looking at the results from the solar battery test. Well, it was online the whole time! So that's great:

Even given the terrible weather in the last few days (140 km/h winds yesterday, and lots of rain and cloud), and even given the non-optimal orientation and angle of elevation of the panel, it seems to be fully recharging during the day. I'll see what this looks like at the end of the weekend, but I'm feeling very confident about the system now. I may also be able to ditch the buck converter for the sake of simplicity, but I should remember to add in some filtering capacitors if I do this.
Next actions:
Well, it looks like the solar charger is reliable and adequate, if a little overpowered. It might be time for a full system test.
I started the full system test today:
I SSH'd in, and it's up and running (starting from just before noon) in the backyard. I set up the shell script to automatically record audio, so now we'll see if it can stay online for a few days. I've deliberately set it up in the rain, so it's as close to a perfect simulation as possible.
I ran some tests with the WiFi to check for connectivity issues. I ended up having to write a script called wifi.sh which automatically connects to known and available WiFi connections every minute. It is immune to drop-outs, and is capable of tethering to my phone.
Next actions:
The 5 V linear regulator was experiencing what looked like repeated thermal shutdown. I replaced it with a drop-in 5 V buck converter which solved the problem. It has now been online, running autonomously, for nearly 2 days! In order to hand over the system, all the files will need to be dumped, and the WiFi passwords file configured to allow a connection to the client's phone hotspot. Then, after they have been taught how to access the files, they will need to be shown how to set up and use the device correctly. Apparently, all that is being waited for now is ethics approval, and then the device can be implemented in the field, hopefully early next week.
Next actions:
Handover was completed today. It turns out that this device works most easily with Android devices, partly due to the way that the hotspot on iPhones works. A few changes were suggested:
I'll implement them before we roll out the device in the field on Sunday morning. The next version was talked about, including scaling up the system for multiple recordings. It might be possible to link the devices via WiFi, and conglomerate the data in a central location. Having said that, thre's a lot of value in modularity. The key cost is the power management system. I'll revisit this all once I know a bit more about solar power and SLAs.
Next actions:
The field test for the device has been pushed for regulatory reasons. The hard drive has been cleared and backed up to the desktop, and the battery placed in another container. Now I just need to black it out to avoid freaking out the birds, and deploy.
Next actions:
The system was installed today. The trip out to the island was long and fairly difficult, especially lugging the heavy gear. The difficulty, plus, the risk to human safety, combined with the potential ecological damage, gives rise to the need for long range wireless communications. The next version will need to be ready for deployment by December, and will need to be able to record from multiple buurrows simultaneously, and send the information back to UWA from Breaksea Island. So, a few more problems to solve there. Somehow, either multiple microphones need to be conected to one Pi (unlikely) or multiple Pi's need to be connected together to form a network. I just pre-emptively bought 10 microphones and USB drivers to allow time for shipping. I've had an idea regarding multiple burrows from a single Raspberry Pi, involving USB splitters connecting multiple microphones to a single Raspberry Pi. The power problem still remains to be solved. It's at least possible that many USB microphones could connect to one Raspberry Pi. I need to try it out before I commit to it as an idea. On the other hand, Raspberry Pi's are relatively expensive. Are the wireless versions even worth the extra money? I think they are, even just to be able to use the WiFi protocol. The other thing which would be good is a serious extension for the audio cables, allowing me to listen to multiple burrows from one Pi. Potentially, I could listen to as many as a USB splitter will support. Experimentation will be required to test this limit. Wiring costs are going to increase as the number and length of physical connections increases. It looks like I can buy 100 m for around $30, so that's not too bad. Apparently I can use curl to POST from the command line, so that kind of solves the inter communication problem.
Then, after all of that, the information has to be sent to a remote station. This could be a 3G connection of some kind, or it could be a long range radio. There aren't any other obvious solutions. At least, not obvious to me.
I'm a little worried about the time limit though. I have 4 weeks to deploy the next version. This is barely enough time to order things from China.
So, there are a few things to test, and questions to answer, ordered by importance:
I should be able to test 1) with the Raspberry Pis that I have. Then, 2) needs to be worked on as fast as possible, since it's critical and complex. 3) should be trivial, but relies on 1). 4) will save some money. 5) is more of a question of logistics, but will also save money.
I'll also need to get a new requirements analysis done ASAP for version 2. I'll draft that, and send it to the client as quickly as possible for approval.
Next actions:
curl)I've thought of a possibilities for the long range connection. nRF24L01s are easily able to communicate over this distance. A WiFi bridge is also possible, something like a pair of Ubiquiti Nanostation Loco M2. We still have the 3G option. Finally, we can try to tap in to whatever internet they have locally on the island. If cost is the concern, I can see how this will turn towards the cheap nRF24L01s, even for the inconvenience of the work. This solution is, at least, technically possible, though it will require some directional antennas.
After setting up 2 Pis on my network, and enabling SSH for both, I able to send a file using scp test.txt pi@10.0.0.101:/home/pi. It still asks for a password though. Apparently, this can be fixed if you can authenticate all of the devices correctly by generating an SSH key. This would just be a shell script I would use as part of the setup for each Pi. More realistically, I think I'd just copy the entire SD card for each device and burn the image.
I also sent the email to the client and am awaiting their response.
It seems obvious that it will be a major saving to use multiple microphones connected to an individual device, if this is even possible. I just ordered the parts to attempt a trial with 4 microphones, and threw in a few extra cheap and useful things.
Next actions:
Got a reply from the client:
The latest thinking involves leaving the data remote, for the most part, and performing the data analysis at the site. This would greatly reduce the data overhead, and make a 3G connection feasible. Dongles cost around $40, and the data itself isn't too expensive. It's likely that all the devices will connect to some WAP, and one of them will have a 3G dongle to allow connection to the network. I just need to get some of this data back, and work out how possibile it would be to process it remotely.
Then, in terms of turning of the Pis during the day, this seems like a good approach. I could probably wire them all up on a bus to be controlled by an Arduino with an RTC. I can shut down with cron, and then switch the power with a relay. To turn everything back on, I would just need to flick the power back on, and everything should just whir into life. The advantage of this is that the Arduino could take all the weather measurements that are required.
I'm now thinking of using the Huawei E8372 as the 3/4G modem. I think I'll just buy one and start playing, there's a lot I can learn with even the hardware I have here.
Next actions:
The feedback recieved indicated that my design was (probably) fine. The 3G modem was bought today for $39 from Target. This, combined with the ZeroTier software that I was told about, should complete the system. The inclusion of the router depends on the range of the WiFi network produced by the dongle, or the Zero W.
I've activated the 3G dongle according to the instructions. It looks like it draws a fair amount of current, I might have to scale the output slightly, depending on the range of the signal, and the proximity of the other Pis. It turns out that this whole system is way easier to deal with if I just connect everything to the hotspot via WiFi. Probably.
Yay! I just connected via the 4G network! Next step: ZeroTier. We've got to make this into a server.
Next actions:
I just downloaded and installed ZeroTier on the Pi and my laptop (using Google to sign in), and connected them both to a network I had created without any problems. I had a bit of trouble working out the IP situation until I remembered I had forgotten to authenticate the devices on the ZeroTier website. Once that was done, the IP of each device was displayed, and I was able to SSH in! After a little bit of fiddling, I set the Managed Routes to 10.1.0.0/24 (24 signifies the number of bits which are set in the address), and the range from 10.1.0.1 to 10.1.0.254. Then I set the addresses of the devices to something more sane (1, 2 etc for the devices, 100 for my laptop) and everything is sweet.
Now I can begin looking at solving other problems. I think the next one to focus on is the microphone extensions. I'll need to buy a jack in towm tomorrow.
Next actions:
I bought the audio jacks, but I think a better idea is to buy male to female leads and use them instead. So, I did that. I think that I've proven that the microphones can be extended...No, I need to actually try it. I wonder if they are open tomorrow. They are. I'll do that.
Next actions:
All the stuff has arrived, but the micro USB adapter doesn't fit! I'll have to buy a couple from town.
Next actions:
Bought some, got the Pi set up (this time with /etc/networking/interfaces), and am tempted just to create an image of this to avoid having to do it in the future. Yeah, I'll do it. Only awkwardness is really the hostname. Copied to desktop. SSH, arecord -l to list the devices (4 there, good), recorded a few test files (arecord etc etc from before). Now to test if I can record multiple files at once: looks like I can! I will try to confirm this properly later, but it looks like I'm cooking with gas. Wooo!
Next actions:
Yeah, so, it's definitely recording different files. Excellent news!
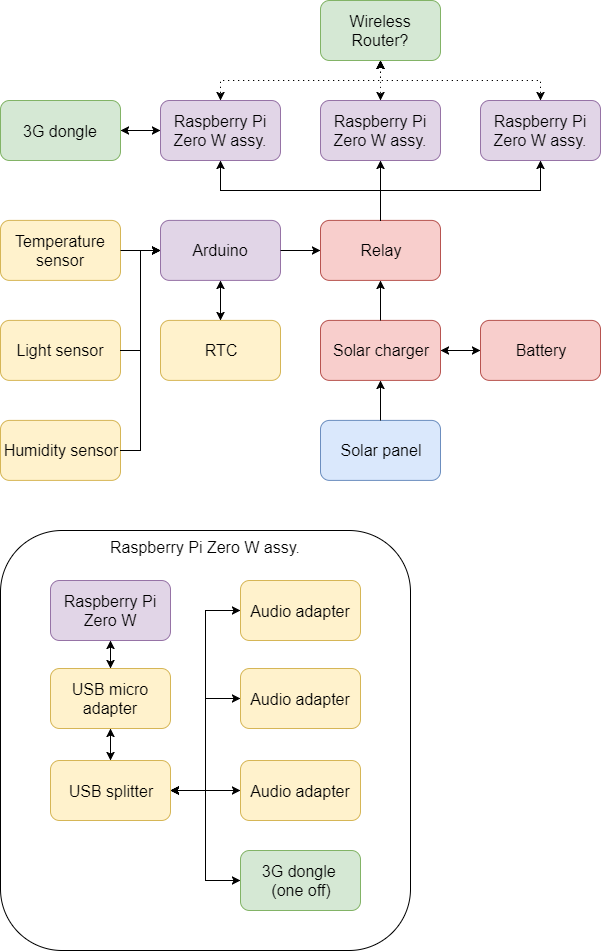
OK, th power situation. I'm imagining a solar charger setup, and then a 12-14.5 V output leading to multiple female power outputs, one for each Pi. The power line runs can be a little longer than last time, thanks to the flexibility offered by the voltage drop in the lines. So, the power box would contain the battery and charger, as well as the relay which controls the power to the Pis during the day. This means that the Arduino would also need to be in here, and so I really need to be thinking about how to sort out that Arduino connection. WiFi is tempting, but may be more trouble than it's worth. Well, it's either that or serial. Serial only means that the Arduino needs to be co-located with the Pi. Although, there are 2 seperate functions here. One is to turn the Pis on and off, the other is to measure weather. The Pis can actually be turned off on a timer, so I don't really need to worry about that. Although, with them off, there will be no way to contact the servers to get data. And with no way to control that relay, I'll be stuck at it's whim forever. A good compromise is having one Pi always on, with access to a relay controlling the power to the other 2, along with a failsafe reboot at noon each day (software and hardware) in the case of accidently typing sudo halt. If the SD card is big enough, I should be able to keep all the data on that one. So, it will need access to the Arduino for the relay. Tricky to make sure I don't get suprious power outages when the Nano is reset by a serial connection. I better start sketching this out:
The current design is contingent on the range of the 3G module. Perhaps I should test it in real world conditions. I guess I've at least solved the power problems: 2 outputs from the solar node; the dongle, and the Pi power. Then, the Pi power goes to the master node, which controls the power to the other 2. So, At night, all 3 need to be powered, but during the day, only 1. I need to actually check the current draw of these Pis, but assuming 150 mA each with a switching converter, that would be less than 2.5 W, which is roughly 0.2 A, which is roughly 2.5 Ah per night in dark hours (12 dark hours per day). So, a 7.2 Ah battery SHOULD still be acceptable. Better test it anyway. If I needed a total of ~4 Ah per day, then a 40 W solar panel should be overkill. But, the 3G dongle also draws a fair amount of current. I guess the 2 things left to characterise are the solar charger and the 3G dongle. Then I can even pick the solar panel.
Next actions:
Checked on the system today, all functioning correctly, difficult to connect to the hotspot, but that is probably more to do with the hacky code than the Pi itself. 14 days worth of audio was recovered, all offset by 4 days and ~12 hours. The expert suggested that the burrow had fedinitely been lived in, which means that, in theory, there should be bird audio of some kind on at least one of the files. Somewhere around 8pm is supposedly ideal.
Next actions:
I've spent a lot of time over the last couple of days trying to get data out of the audio. Main work so far:
At this point, I asked for some feedback regarding the ultimate data visualisation.
In order to easily measure the power consumption of both devices, I need a male to female USB adapter, which I will then carefully hack to allow me to insert a multimeter to measure current.
Next actions:
I had a meeting with the client today. The main outcomes:
I measured the current consumption of the 3G dongle as around 0.2 A, the Pi as 0.14 A (and 0 A when shut down), and around 25 mA per microphone. So, a 3 microphone setup would consume around 0.415 A, but the current draw of the 3G dongle is too high to let it boot from the USB output of the Pi. Using a seperate USB output, 0.415 A would use around 10 Ah per day. This is getting dangerously close to the the overnight 7.2 Ah capacity of the battery. I could use 2 in parallel, but it would probably be cheaper to buy one with the correct capacity (actually, it totally isn't. Weird. The economy of scale doesn't seem to kick in until 50 Ah). I can't really cut power from anywhere in particular. In fact, the scaled up system could use as much as 20 Ah per day (3 Pis, 9 microphones, and a dongle). I could make certain windows for accessing the device, and shut of the dongle in the meantime. I can also turn off the Pis any time they are not required (during the day in the case of the muttonbirds). I've bought another battery, just in case.
Next actions:
I finished the script, and it saves audio files for each relevant audio interval. Having a listen to the audio now, I seem to have done an OK job. There are still random files which contain its of noise, but on average, I've managed to capture useful information.
I bought a 3G antenna to assist with reception in the proposed remote area.
In order to record multiple audio files at once, something like the following is appropriate:
sox -r 44100 -b 16 -t alsa plughw:1,0 test1.wav trim 0 00:30 & \

sox -r 44100 -b 16 -t alsa plughw:2,0 test2.wav trim 0 00:30 & \

sox -r 44100 -b 16 -t alsa plughw:3,0 test3.wav trim 0 00:30
This assumed that your microphones are laid out in that order. Check with lsusb. Basically, higher quality audio shouldn't be a problem. I'm going to try and see if I can keep it as a raw .wav, but if i can't so be it. Getting sme test audio at the moment for a calculation. So, pending this information, I should be good to go. I just need to put it all in a box really. It would be nice to put a power switch on this one.
This link promises to get rid of issues with warnings from alsa. Also, weirdly, the microphone with the longer cable seems to have none of the clicking which is present on the other tracks. I assume this is something to do with line inductance or capacitance. Maybe it's worth fitting them all out with cables.
Doing some testing with different audio qualities: it looks like 44.1 kHz is fine as long as it's an mp3 being recorded over 1 channel only. 7.9 kB/s gives around 28 MB per hour, 666 MB per day, which gives 2 GB per day. So, 3 microphones need around 6 GB for the 3 days. An 8 GB card JUST offers enough space, but I wouldn't risk it. So, 16 GB will be necessary as a minimum. I have some spare 32 GB drives, I'll try one of them tomorrow.
The solution to the power problem depends on what the client wants. I am going to try to push for the 2 battery solution so that I can trial the 3G network.
Next actions:
Experiencing issues with recording multiple 44100 Hz files (inconsistent results, high CPU usage). I've tried reducing the quality to 8000 Hz and adding a 10 000 sample buffer. Actually, the solution might be to record as a .wav, and then compress to a .mp3 later. I'm noticing much lower CPU usage while recording now, I'll set up the cron job later if this first run works. It seems to have worked. It looks to take around 9:30 minutes to convert that into an mp3, taking it from 303 MB to 28 MB.
It looks like this all works fine. I suppose the next problem is the actual writing of the shell scripts wich make everything work. Record audio every hour, compress audio (if required), delete uncompressed audio (if possible). I might need that backup hard drive sooner than I thought.
Lots of stuff arrived today, but mostly importantly, I now have the 12 V to 5 V USB adapters. This will need testing ASAP: turns out, it works! Seems to warm up a little, but is generally quite efficient.
I just realised that I can keep the raw audio files as .wav if I give each device 32 GB of storage (0.3 GB * 24 hours * 3 days ~= 24 GB). So, let's create that as a bare minimum, and then investigate file compression later. This doesn't work when you consider that I'm recording with 3 microphones. Compression is required. Step 1 will be to produce an image I can copy from one device to the others. Actually, it would probably be better to have a shell file that I run to set everything up, that would be way smaller, and way easier to edit (even though it would take a little longer to set up). I can do this later though. Firstly, I just need to get this 2nd prototype working for the 23rd. Really could do with that second battery...
Some quick, back of the envelope calculations show that even though a smaller solar panel may be appropriate, it would probably be too risky to redice it's size.
I need to test this device ASAP. The battery may arrive tomorrow.
Next actions:
I worked on the shell scripts today, and I think I've got them working. They are a lot more sophisticated than when I started with this project. I'll include them, and their explanation, in the final documentation.
The theoretical steps so far:
/boot/wpa_supplicant.conf: network={ ssid="SSID" psk="password" key_mgmt=WPA-PSK }/boot/ssh to enable SSHI've been having some trouble with the fake EVO SD cards. It seems that it's worth spending a little money here. I'll need a 16 GB card for 3 days (28 MB * 3 microphones * 24 hours * 3 days = 6 GB) which I'll buy this afternoon.
Also, for future, it seems that the hard drives might be a bigger problem than I thought. They draw a fair amount of power. If I use a RPi 3 as the hub, then it could switch the power on it's USB output. This might end up using more power than it consumes though, since the Pi 3 draws more power. However, it does also have a bunch of extra computing power. Yet another tradeoff.
The other one I'm dealing with at the moment is the computing power of the Pi Zero is limiting the extent to which I can compress the audio in the time that I have (since I'm recording in realtime). This is going to create a long term data storage problem, but I will be fine if it's only 3 days.
It looks like the new system is working OK:
And for my records:
I'm going to leave this running overnight to try to prove to myself that it's working correctly.
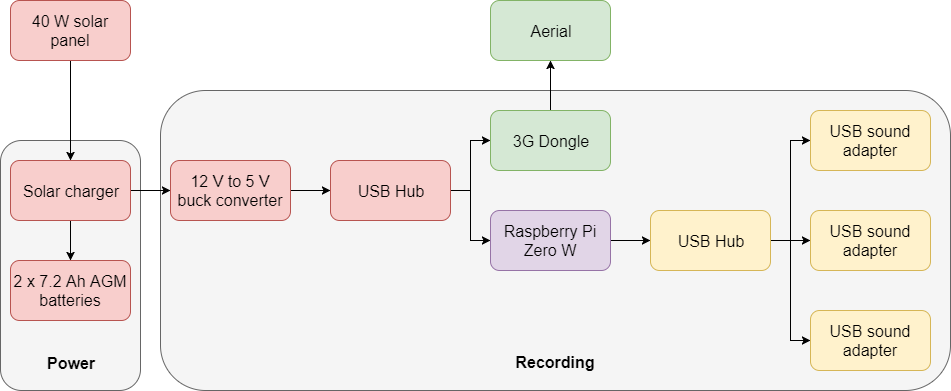
Next: hardware. So, I think 2 batteries will be sufficient in parallel. It would be great to test this more, but perhaps I'll do this with the other device. Note to self: don't ty to install/uninstall stuff in a weird way, it makes things break. Then, power this all with a 40 W solar panel, add in a solar charger, chuck all of that into one box. 12 V comes out, plugs into PC box, goes into 5 V buck converter, then powers USB hub 1. This powers the 3G module and the Pi, which connects to another USB hub with the 3 microphones connected. Another connector for the solar panel, and everything will be easily handled. Perhaps the 3G module is seperate in order to allow space for the ariel. I guess I need it to arrive to see how large it is and see the length of the leads etc.
Software: SoX, ZeroTier, and my shell scripts. Modifications to crontab, WiFi etc. Arbitrary folder structure. I'm hoping my minimalistic approach will help a lot with modularity, though I am seriously considering a Pi 3 as a main server for networks containing more than 1 node. The main advantage will be the ability to switch USB loads. Hmmmm. The more I think about it, the less important that seems. I'll let the energy budget do the talking.
Next actions:
Requires:
Steps:
/boot/wpa_supplicant.conf to connect to your local network by default/boot/ssh to enable SSHsudo apt-get updatesudo apt-get -y upgradesudo rebootsudo raspi-configsudo apt-get install -y libsox-fmt-mp3 soxcurl -s https://install.zerotier.com/ | sudo bashwget https://github.com/zerotier/ZeroTierOne/archive/1.2.4.tar.gztar xvzf 1.2.4.tar.gzrm 1.2.4.tar.gzcd ZeroTierOne-1.2.4make zerotier-selftest and then ./zerotier-selftest to test basic functionalitymake (takes a while to run, maybe an hour)sudo make installsudo ./zerotier-one -d gets the program runningsudo zerotier-cli info verifies that everything is working as it shouldsudo zerotier-cli join [Network ID] joins your networksudo zerotier-one -d runs the service (but see below)sudo cp /YOUR_ZERO_TIER_FOLDER/debian/zerotier-one.service /lib/systemd/system/sudo chmod 644 /lib/systemd/system/zerotier-one.servicesudo systemctl daemon-reloadsudo systemctl unmask zerotier-one.servicesudo systemctl enable zerotier-one.servicesudo systemctl start zerotier-one.servicecd ~; mkdir 1 1/wav 1/mp3 scripts; cp -r 1 2; cp -r 1 3convert_all_audio.sh, convert_audio.sh, and record_audio.sh etc.chmod +x scripts/*.sh/etc/wpa_supplicant/wpa_supplicant.conf to include the 3G donglewget https://bootstrap.pypa.io/get-pip.pysudo python3 get-pip.pysudo pip3 install gpiozerowget https://raw.githubusercontent.com/TonyLHansen/raspberry-pi-safe-off-switch/master/python/shutdown-press-simple.py/etc/rc.local to include sudo python3 /home/pi/shutdown-press-simple.py before exit 0;sudo apt-get install python3-rpi.gpio./scripts/record_audio.sh 1crontab -e):
		@reboot sleep 60 && python3 /home/pi/scripts/begin_audio.py
		* * * * * /home/pi/scripts/shutdown_simpler.py
		0 * * * * ./scripts/convert_all_audio.sh

		0 * * * * ./scripts/record_audio.sh 1

		0 * * * * ./scripts/record_audio.sh 2

		0 * * * * ./scripts/record_audio.sh 3
Starting to hone down now. Still waiting on the second USB hub and that solar panel. Need to make all the boxes etc.
I also ended up making some path based modifications to the scripts.
Next actions:
I've bought a box to mount the new project in. I'm still not sure if I'm going to be mounting in 1 or 2 boxes.
I've tested the code, and it works. Some extra functionality does occur to me though: I could program it to egin recording audio as soon as it turns on, until the end of the current hour. This seems like a really good idea, especially useful for testing purposes after initial setup. The best way to implement this would be to port everything into python and do datetime manipulation in a more bulletproof way. I've written a python script, and now I'm waiting for the hour to end so that I can test it. It's currently hard coded for 3 microphones, I can fix this later. It seems to work!
The other thing I'm thinking of adding is a shutdown button, which allows the implementation of a power switch. Both will be necessary. To this end, some soldering will be required to connect a button to the GPIO. This program seems to be suitable. It also point to the potential need for a reset button, but I feel that this would be adding too much complication to the UI, since the swutch will allow the user to perform a power cycle. i was able to download and use the code, after getting pip to install the GPIO interfacing package. I ended up running it differently as a minutely cron job to avoid the relatively CPU intensive signal.pause() required to make the program work. I ACTUALLY then ended up coding my own button using only the most basic library, which consumes 1 second of CPU time per minute, down from the original 20, and the slightly better 4.
Currently testing all of the code, started at 9:11 pm, so I might run this until tomorrow morning.
I noticed some weird problems with the begin_recording.py, which I haven't really resolved (I patched it by getting the computer to first wait 60 seconds).
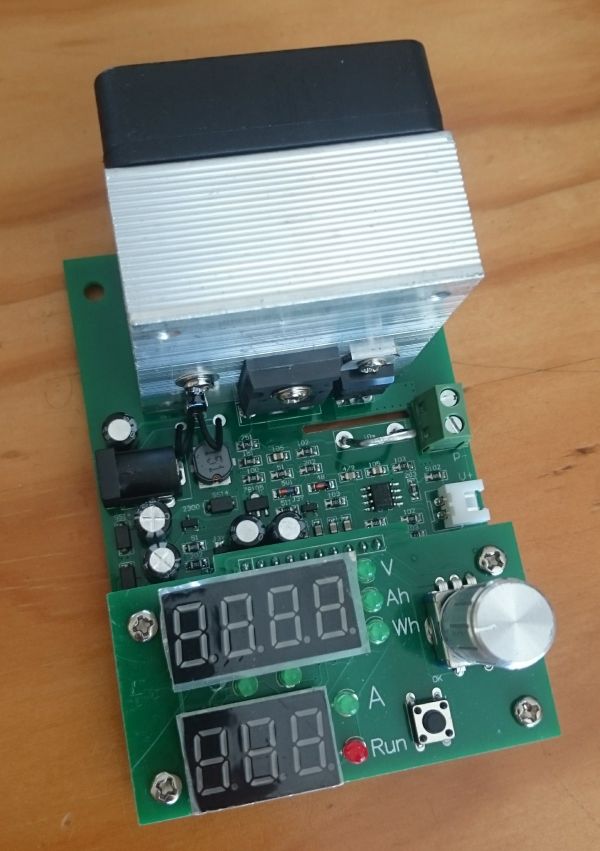
I also need to check the exact current consumption of my current setup. I'll do that on Monday when I finish my benchtop power supply by simulating a 12.6 V supply going into the 5 V step down converter.
I've decided to put everything into the one box. I'm hoping to spray it tomorrow.
Next actions:
Power consumption (tested with benchtop power supply, going through 12 V to 5 V step down conversion):
| Item | Power consumption (W) |
|---|---|
| Raspberry Pi Zero: Halted | 0.22 |
| Raspberry Pi Zero: Idle | 0.64 |
| Raspberry Pi Zero: 100% CPU | 1.10 |
| USB microphone | 0.15 |
| 3G dongle | ~1.00 |
Therefore, the total power consumption of the 3 microphone system is 2.4 W (assuming 66% CPU loading), which is around 0.19 A, or 4.6 Ah per day.
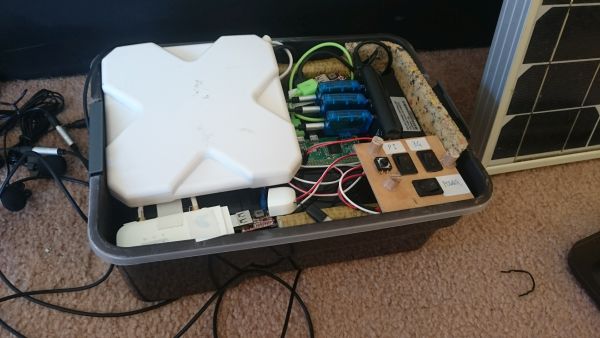
Today, Bird Recorder 1 was retrieved. No mishaps, and all of the data was collected without incident. The same afternoon, I built Bird Recorder 2. Nearly without incident, but some weirdness with the solar charger. I ended up just replacing it with the working one from the previous build. COmpleting the final testing now.
Finally managed to install ZeroTier on my phone, an made an SSH connection all the way through the 3/4G network.
Next actions:
So, I'm trying to price things up at the moment. It looks like everything is a little expensive. I'm going to try and save some money where I can.
I need to start really thinking about the design of Bird Recorder 3. Here is a list of costs of the first 2:
| Item | Cost | BR1 & BR2 | BR1 | BR2 | Sum of 1 and 2 | Cost of 1 and 2 |
|---|---|---|---|---|---|---|
| 40W solar panel | $47.00 | 1 | 1 | $47.00 | ||
| Charge controller | $10.00 | 1 | 1 | 2 | $20.00 | |
| 7 Ah 12 V SLA battery | $22.00 | 2 | 2 | $44.00 | ||
| USB micro cable | $2.00 | 1 | 1 | 2 | $4.00 | |
| Raspberry Pi Zero W | $18.00 | 1 | 1 | 2 | $36.00 | |
| micro USB male to USB type B female OTG adapter | $1.00 | 1 | 1 | 2 | $2.00 | |
| 16 GB microSD card | $13.00 | 1 | 1 | $13.00 | ||
| 3D Sound USB audio converter | $1.00 | 1 | 3 | 4 | $4.00 | |
| Microphone | $1.00 | 1 | 3 | 4 | $4.00 | |
| Microphone extension cable | $1.00 | 6 | 6 | $6.00 | ||
| Box | $4.00 | 2 | 1 | 3 | $12.00 | |
| 12 V to USB step down | $1.20 | 1 | 1 | 2 | $2.40 | |
| USB hub | $2.00 | 1 | 1 | $2.00 | ||
| 3G dongle | $39.00 | 1 | 1 | $39.00 | ||
| 3G aerial | $14.00 | 1 | 1 | $14.00 | ||
| Total | $249.40 |
While I am finishing all the data conversions, I thought it might be prudent to do some back of the envelope calculations for the power consumption of the Bird Recorder 3. Given the power consumption figures calculated on 2017-11-20, I should be able to design a suitable system. I just noticed that according to this Raspberry Pi comparison, the Pi Zero has roughly 10% of the processing power of the Pi 3. I was also thinking about the camera, and found a great example of using a package called 'Motion'. Getting bogged down in details. Current considerations:
cron + relays should take care of thisSo, the main results of that design review (if you could call it that) are the need to test the cameras, and the probable need for a Pi 3 (though this depends enoromously on the available power supply: it uses 3 times the power for approximately 10 times the processing power, which is good, but the idle power is more than double). I can't really size the solar system properly until I have finished the final design.
I started trying to install the motion detector with sudo apt-get install motion. Make sure you update first, of course. Then:
sudo modprobe bcm2835-v4l2sudo motion/var/lib/motion/etc/motion/motion.conf to allow streaming, and 30 fps recordingI also unpacked the audio from the Bird Recorder 2, and it all sounded pretty good. Getting a little distortion with the really loud noises though. I suppose this is where the microphone adjustment comes in.
Well, the audio processing was super annoying. It's been running for close to 18 hours, just to process around 3 days of audio from a single microphone. This is the problem with higher quality audio (44.1 kHz). There isn't any real way to resolve it unfortunately, I'm being limited by the audio write speed of python itself. Maybe that's the answer... I wonder if SoX or ffmpeg or similar are capable of trimming audio in that way...they definitely are. Damn. Time to rewrite the code.
As an aside, it's worth mentioning that audio files can be split into smaller pieces for faster processing, if RAM is the limitation.
Well, the code took nearly 6 hours to run, but it's finally done.
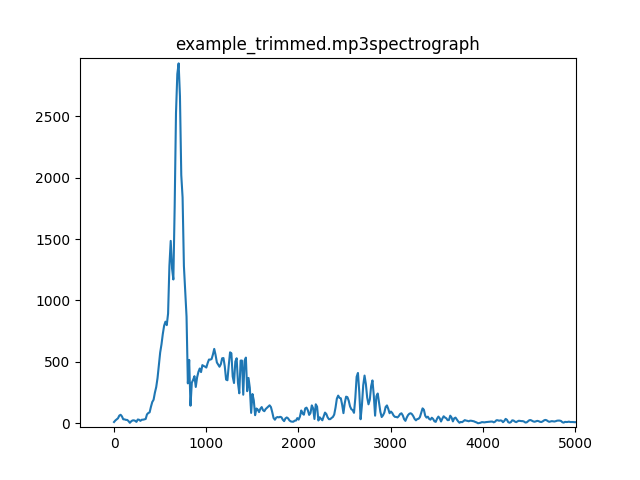
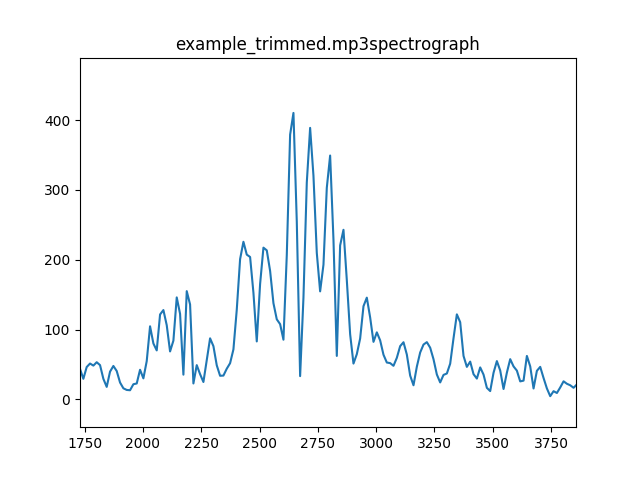
I rewrote the code in friendly classes as bird_recorder.py, and leaned more heavily on the ffmpeg C code as described in my previous post, and the whole thing is LOADS faster. Now I'm tying to confirm the exact nature of the audio I'm trying to detect, so that I can properly tune the bandpass filter and the peak detector.
Next actions:
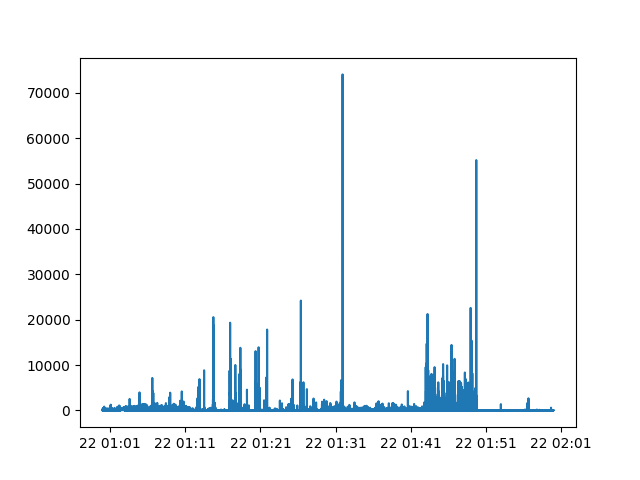
bird_recorder.pyI characterised the audio spectrum to be in the 3000 Hz range, and then bandpass filtered the compressed audio, ran peak detection on it, and then used ffmpeg to trim the relevant audio sections. Python's popen worked really well for simultaneously running manny processes, which resulted in an enormous speed increase in the software (processed and trimmed around 60 hours of 44.1 kHz audio in an hour). The following images document some of the process:
This process still captured lots of useless data, but by ignoring peaks that were too high or low, I managed to pare out most of the unwanted clicks and silences. The audio was sent to the academic for perusal.
Well, the time has come to redesign the bird recorder for the new deployment.
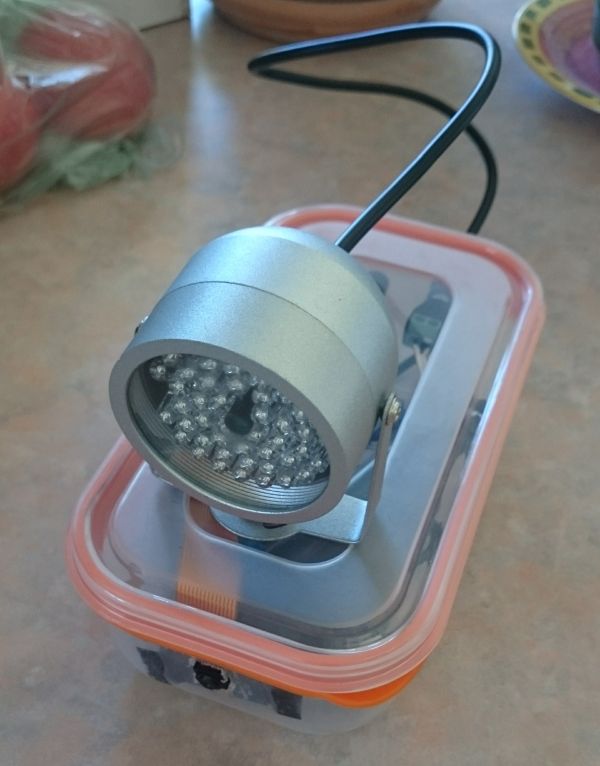
Problem 1: the camera I'm using claims to be IR. I need to test that. I just need an IR LED and a light. ...I can do that right now. I ended up having to watch the video using omxplayer on the Raspberry Pi itself though, since the FTP software was having trouble with the enormous directory. The following command deltes all the image files from the sever: sudo find . -maxdepth 1 -name "*.jpg" -print0 | sudo xargs -0 rm. Well, the IR light can definitely be seen. So that's good. I tested it with an IR LED from an old TV remote that I hackaed apart a few years ago. I'm going to guess that IR light in any reasonable range (850 nm to 910 nm) will trigger it, so I won't get technical there. The problem is that these lights draw a far amount of power. If it were motion activated (perhaps by some passive IR) then this would be fine. I just hope that something as small as a bird can be detected. Maybe I would be better off with some permanent LEDs set up. It comes down to power consumption and cost. 1 LED draws 1.22 V at 23 mA (measured), which is around 2.8 mW. This is low enough to consider as a permanent load, even in an array. Even 100 mW would allow nearly 36 LEDs, perhaps arranged as a square. I just had a look at the footage, and the IR camera defintely works. I wonder how may LEDs will be required to light up the birds. I'm going to order a bunch from RS. It depends on the range, and probably a few more things. And, I just double checked, and birds can't see IR light. Phew. I'm going to buy 50 throughhole LEDs to play with, and I'll see how they go.
I've nominally added a UI panel to the unit. It could provive users with information using various indicators/screens, and a few buttons for controlling the devices. I'm very tempted to just rip out the power...I did some reading, and it seems that corruption is actually quite rare, most of the time. However, since I will be using these devices in a more high intensity IO manner, I think it's prudent to include a shutdown button. Anyway, in terms of indicators: ON, WIFI, RECORDING AUDIO, RECORDING VIDEO all seem like useful lights.
I'm pretty sure that with all this new processing power required, I'm going to need a beefier processor. For this reason, I think it's critical that I have a RPi 3 out there on the island for my use. The extra power consumption needs to be designed for, I consider it to be essential. I better buy one.
The WiFi range of the 3G dongle needs to be tested. This way, I can set power cable lenghts for the two Zeros.
I need to calculate the solar panel array size, and the amount of battery storage.
The design is starting to look quite complex. Luckily I have learned to make things easy to assemble.
I'm going to try to make a basic power budget. Preliminary calculations suggest that 2 batteries will be enough in terms of power storage, though the load will run the batteries down to less than 30% every day. More batteries would be safer. It would be pretty easy to set up a ~ 6 W load to run in the back garden as a test. I've bought a 27 Ohm resistor to do the job. I've also just bought a couple of MCP3008s (ADCs) to measure battery voltage, since it would be cool to have this set up as a wireless solar experimentation station.
Next actions:
Well, I've had a bit of a generous Christmas break. Since then, I've shown that a 7.5 W IR floodlight is more than enough to light up a room, so ~ 1 W might be appropriate for viewing a few birds. The LEDs still haven't arrived though, so I haven't been able to make the test light.
I did a quick test with the 3g module, and it seems to have a range of over 30 m. Google seems to suggest that range won't be a problem. I should get a Pi set up with an LED showing connection status and check for myself.
Wow, I almost forgot! I need an external hard drive too. Better update the power budget.
Next actions:
Time to test these LEDs. One LED draws 1.17 V, with 0.017 A, around 2 mW. So, an array of 25 would use only 50 mW. Might be a little on the small side. It looks like I would be better going with larger LEDs and using fewer of them. At an extreme case, maybe just 1 of the 1 W LEDs. I checked the datasheet, and I had made a mistake: I could actually get 0.05 A at 1.25 V, giving around 63 mW. So, 2 or 3 of these could be enough. I was getting some visibility at around 30 cm. This might not be ebough. OK, let's go on the overikill side: 4 LEDs using 0.25 W. I'll use them in series, so the required resistance will be (13 - 4*1.25)/0.05 = 160 Ohm. But, this gives of 0.4 W of power dissipation in the resistor. Maybe I need to use more LEDs to make my life a bit easier. If I used 10 LEDs, I could use a 10 Ohm resistor with only 25 mW of power dissipation, or if I used 9 (for a square) I could get away with 35 Ohm and 88 mW. Both are fine. This also depends a lot on the atual battery voltage. This is all contigent on the battery voltage being just right, I don't think I have a great deal of room for error. Let's test. 13.1 V battery gives 0.6 V over the current limiting resistor (10 Ohm) ... misread the datasheet again. I need to keep the current below 50 mA (absolute maximum rating). Pretty tempted to push for 40 mA, but in this application it needs to last for many hours, and I think that 30-40 mA is more appropriate. Still, 10 at 30 mA would still give 0.36 W. And given that the battery voltage will vary, I think I might actually need to use some current limiting here to keep everything nice. Luckily, 30 mA is easily within the range of most devices. The LM317 jumps to mind, and according to 8.3.7 of the datasheet, an LM317 with a 43 Ohm resistor will drive 7 IR LEDs with a current of 30 mA.
Next actions:
I had a play with the IR LEDs, and using an LM317 I managed to get a couple of strings of 7 LEDs all working. It's a little hacky though: if one string were to lose a single LED, then all the current would be diverted through the second string, which might cause failure of the LEDs. In terms of brightness, it's nowhere near as powerful at the 7 W floodlight, mostly because it's sitting at 0.7 W. This is still possible, but I need to know how bright it has to be, and I need to make sure the design is robust enough to allow LEDs to fail. Multiple drivers might be the answer, but the current efficiency is pretty low, with around a third of the power being consumed by the driver. Waiting for feedback from client to establish required visible range of IR. I may end up using larger LEDs. The client says that they'd like a range of up to 2 m.
Getting way too many files on the security camera. find /var/lib/motion/ -type f -name '*.jpg' -mtime +2 -print0 | sudo xargs -0 rm should take care of it. Then, to find the hard drive: lsblk; sudo lshw | less; sudo mkdir /media/externalhd; sudo mount -t ntfs /dev/sda1 /media/externalhd/.
Next actions:
I measured the voltage produced by the power supply for the external hard drive at 12.28 V. I found an appropriate DC connector, and powered the device through my benchtop power supply. At first glance, the power consumption of the hard drive looks really high (~ 6 W), and that is ignoring a 20 W start-up power draw, and then a ~ 1.2 W power draw in idle. This might be a little on the high side, though, a quick inspection of the energy budget shows that it's acceptable.
I think the next important goal is to test the energy system, since it's pretty critical, whereas the camera stuff isn't that important. I'm thinking that 4 batteries would be best. With an average current rain of around 0.5 A, there's a 6.35 W pewr drain. To test it properly, I need to drop >8.5 W at night, and maybe 6 W during the day. Let's call it 10 W and 7 W to add a little bit of cream. So, 15 Ohm and 22 Ohm would do it. I'll need to refine these figures properly, and check what I have in stock. I have a 20 Ohm one, whih would give 7.8 W. Maybe this would be fine 24/7, which would be a 23% overhead. I just need to nail down the NoIR camera and RPi power consumption.
Next actions:
I started making the power generation system. 3 batteries hooked up in parallel to the solar panel. Now, I need to get the Raspberry Pi working. It must be able to:
1) needs an ADC converter. The one I've bought is the MCP3008, and the guide here is very helpful in setting that up. The main choice is hardware vs. software SPI. I would prefer to get hardware SPI working. On top of that, 4) uses I2C (If I decide to use the BMP085/180) so this might just be a good time to generally mess around with GPIO. Breadboarding for the win. 2) Can be achieved in the same way, using an electromechanical relay. 3) is trivial, and only requires the right wpa_supplicant file.
(I also found this cool sun path calculator).
I soldered headers to the GPIO of the Raspberry Pi. Then I hooked up the MCP3008 as described by the article linked above, using the python package installation method. Easy to get it working, as long as you remember to enable SPI from raspi-config. Then I calibrated the voltage divider, and connected the relay to GPIO. Super easy! Now I jyst need to work out how to run the actual data collection. A cron job would probably be the most bulletproof option. I've set it up and got it running. Something weird going on with the GPIO, but nothing that a reboot doesn't fix. It's all software from here anyway.
Next actions:
Well, the data is still flowing in. It's still not clear if the extra battery will be required, but I bought a spare today anyway. Likewise, it's still unknown if the solar panel is large enough. There are a few things which must still be purchased:
...which brings me to my next point. Those IR cameras need to be completed. It seems that 0.7 W is too little, but 7 W is too great. I only allowed 100 mW in my energy budget. As a friend points out however, I can simply lower the voltage that I provide the light, and the current consumption drops. Problem solved? I've ordered another 3 lights from Australia. I wonder if I have enough buck converters: no, I only have 1. So, 2 more are required. I can either buy 2 from Australia for $10, and then another 10 from China for $10, or I could just buy 10 for $16 from Australia. Done.
The external hard drive needs to be sized now. It turns out that my room generates around 0.6 GB of footage every day. So, all 3 cameras will probably generate around 300 GB in 6 months. At 28 MB per hour for 44.1 kHz .mp3 audio, I need around 1 TB for the audio. So, 2 TB should cover it. Maybe I could do with less if I kept deleting "blank" recordings. I should buy 1 TB if there is a significant cost saving.
As an aside, to validate the usage of a Raspberry Pi 3, compressing 6 minutes of 44.1 kHz wav audio to mp3 takes 21 seconds, so an hour would take 3.5 minutes, far below the Zero. And that's just on one core! So I can divide by 4 when I am batching them. So, it's still taking around 8 minutes to convert the audio, but at least it can leave the Zeros in peace. A great proof of concept.
What else am I forgetting? I need to start building this system.
Next actions:
Looking at the unbought items: I still need the core-electronics stuff, the sd cards, and the hard drive. Bought the core electronics stuff, and I have a 4 GB SD card that I bought off eBay that seems to work. Just checking to see if I can buy a couple more in time... I ended up buying 3 from cheapchips.com. Not a terrible price, but not great either. At least they are real class 10. And I've also bought the camera stuff. So, lastly, all we need is the hard drive. But I think I might need a few more of those DC socket connectors, just in case. And they are bought too.
Now, battery performance: it's not looking good:
I'm going to have to wait for a bit before I can declare anything. At this stage, it looks like the problem is with the solar panels, and not with the battery storage (since it doesn't seem to be filling up completely).
Next actions:
2014-01-14 12:32: added in 4th battery.
The decision to add in the extra battery yesterday was triggered by an apparently folding in the battery voltage the night before which looks like it nearly completely drained the batteries. Adding in the 4th battery was a stop gap solution.
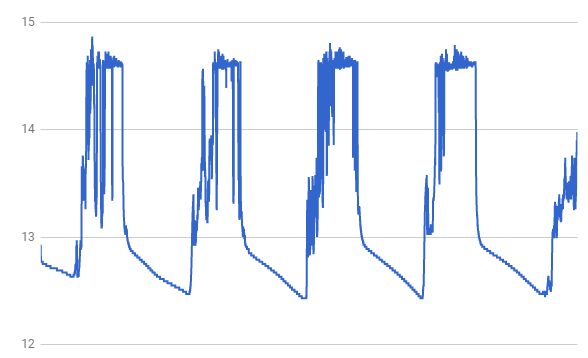
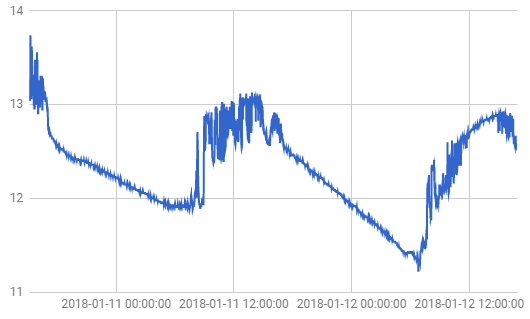
A quick sanity check on the power being produced by these batteries: If the battery voltage is ~ 12.5 V, and the resistance of the load is 20 Ohm, then the power consumed is 7.8 W. The power consumption of the idle Pi Zero is 0.64 W, so the total power consumption is ~ 8.45 W. The nightly power consumption of the system, acccording to the energy budget, is ~ 8.5 W. So, I'm very close to simulating the actual conditions, which is a little worrying. The power consumption during the day is considerably lower at 5.1 W, and is less of a burden. Regrettably, most of the power consumption seems unavoidable. Let's analyse the performance of the system over the last few days:
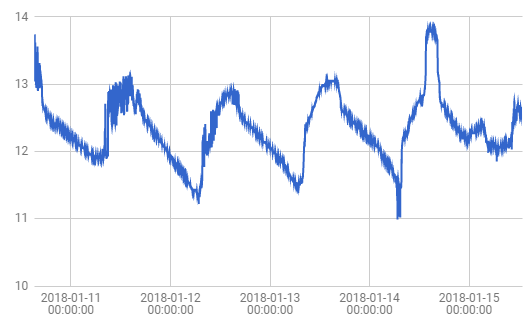
I can't seem to explain this behaviour at all. The point where the new battery was added in parallel can be seen on 2018-01-14 12:32, where the battery bank approaches full charge. But that weird spike in the early hours of this morning is very difficult to understand. I'm just going to have to let this run for a little longer. Part of the ocnfusion results from the cloudy day that we're having, and the next few days of wet weather will be a good test. I'm not sure what I will do in the field if the battery voltage gets a little low, I don't have the same protection I used to have in the other models.
In terms of choosing the hard drive, 2 TB seems to be the right size. Unfortunately, little is provided in terms of power consumption figures on the data sheets. However, I was able to dinf this post which reports the ile power consumption as 0.7 W (yay!) and the active power consumption at 5.3 W (awww...). The eBay listing for the buck converter states that it can output 10 W without breaking a sweat, so I just need to check if the Pi can provide the necessary 1.1 A to power the hard drive, which I'm going to want to use very sparingly. Apparently it can offer 1.2 A, so I'm safe here. But only just. For the convenience of reducing the number of power supplies and cables, I think this is acceptable. But wait, I have other loads on USB, like the microphones, which is a little over 100 mA. I'm going to be maxing these things out. It's a shame that external power supplies have fallen out of fashion. I wonder if I can peel off the power rail to a seperate buck converter. This is a real possibility actually. So, I'll just buy the standard, and solve the problem later if I need to.
The other possibility is the use of a hard drive enclosure and an internal hard drive. Unfortunately, there are compatibility issues to address now. For the convenience, I think I need to get a hold of something a little easier. I can always turn off the USB ports during the day. Oh shit... I don't need 2 TB! I'm only going to be recording for 12 hours per day. So, 1 TB is plenty. Phew! Some money saved there, and probably some power. It's bought.
Next actions:
The hard drive (STEA1000400) has arrived. It seems to draw around 3.0 W max on startup, and settles down to around 1.0 W idle, so it seems well within the capabilities of the Pi 3. I'm waiting to see if it has an even lower standby power consumption... looks like it eventually goes down to around 0.5 W.
It strikes me that it would be much easier to perform the range testing with an external battery pack. I would also like one for myself anyway, so I'm going to buy one. So, that's done. Apparently it has 50 000 mAh, I doubt it. I look forward to testing it.
Next actions:
Well, it's coming closer to the time when I need to actually design some of the actual hardware. I really can't be bothered right now. Oh man, have I forgotten to buy a bunch of extension 3.5 mm audio cables? There's no way to check now, but I need to do this tomorrow. I think I have 5 or so, but I could do with a few more. My old plan was to have the first one plug the hole in the outside, to create a waterproof seal. Is there a way around this? The installation will be supervised by me, so I could easily tape up around the openings. I should have ordered this in advance. I am going to have between 9 and 12 microphones. I definitely have 5 1.5 m cables and 1 longer one. I'll just do it the way I did last time. So, I need 9 short cables, then maybe 4 more short and 5 more long. And I better get some spares. So, I need 10 short cables and 5 long. $63 is prohibitavlely expensive. I'll buy 20 from China for $20. I just had a quick scan through and realised I might be low on USB cables, so I just bought another 5 for a dollar each.
Next actions:
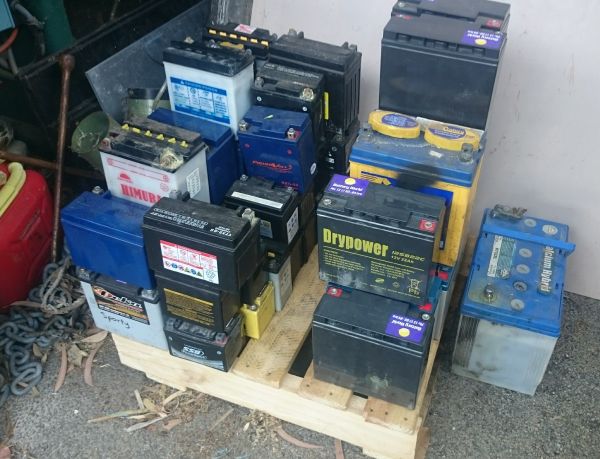
The battery testing is a little hard to interpret:
The good news is that I'm managed to buy a pallet of used batteries for $25. If some of the bigger (22 Ah) ones work, even a little bit, I'm set for life - or at least the next decade. I'm picking up the batteries tomorrow, so, it would be worth designing a test rig ASAP. Let's see: a 22 Ah battery, being tested at C20 (standard for SLAs), I would want to be pulling around 1.1 A. So, I'll need a 10 Ohm resistor capable of dissipating at least 12 W. I don't own such a resistor. I've just ordered an array of 50 W panel pount resistors from 1 Ohm to 220 Ohm. I'll also need to perform internal resistance readings, which I can do by imposing a varying load on the battery. Tricky, since the chemistry takes a while to settle down. My resistor array should now take care of this.
While I was out walking, it occured to me that I could try putting everything together and seeing it it works. This seems like an obvious step. I'll set it up on the little table in the lounge, after I've cleaned it.
Next actions:
I think I need to go into Bunnings and actually buy the containers I end up using on the final version. The main reason for this is that there is little point testing the components seperately since I have very high confidence that all the systems I have designed work. There are still a few details to sort out when it comes to the physical configuration of the cameras, since they need to be on that flexible cable. I will probably end up disabling the camera LED, then masking out an area, spraying the rest black, and sitting the camera on the exterior. This should minimise the chance of something going wrong with the lens/cable.
I started trying to make a model of one of the units, but it's going to take too long. I just need to try and build one and see how much space I need.
OK, I have the batteries now:
So, now they need to be tested. The only thing I'm really interested in is capacity (internal resistance only really matters for big loads, and leakage current is only really relevant for battery storage, which might be considered a seperate experiment). So, here's my proposal for a bettery testing procedure:
The discharge could be easily done by this electronic constant current load which I will probably buy (though there is another more expensive 150 W one, but the former is fine for testing batteries up to 100 Ah at C20, so I think it's fine). The other problem is the battery charging itself, which can probably just be done at a constant 14 V. Correct lead acid battery charging procedure states that charing/float charging should happen at around 13.8 V for 0 to 18 hours: "the battery charges to about 70 percent in 5-8 hours; the remaining 30 percent is filled with the slower topping charge that lasts another 7-10 hours". I think I'm going to do the charging with my benchtop power supply, I don't trust anything else and they are too expensive.
Since I have so many batteries now, it is probably worth keeping them all on float charge somehow.
Next actions:
I tried buying some containers for the Raspberry Pis, but the lids don't fit properly. THis is not acceptable as it poses a risk to the reliability of the device. Tomorrow I'll go to a different shop and see what options they have. I'll test power consumption with the male end of the USB micro cable I stripped, if I can find it. The physical case designs will come together naturally. And I still haven't worked out just how to test the range properly. I could walk one away and do the ping test. Maybe I an get my brother to help. I'll set up the test, and then find him.
Next actions:
OK, I've bought a replacement container for $6.80. A little expensive, but hopefully it can do the job. Putting everything required into the container, and I realise that I'm still missing my IR lamps and USB cables. I hope they arrive soon. I had also made a note to include a UI of sorts:
This is the bare minimum. Everything else is either evident from a visual inspection, or can be controlled through the web interface. I plan to implement the shutdown button in the same way as last time, though it should never really be used, since it can easily be shut down from the web interface. I'll wire that up to a little protoboard which I will hot glue in, and then have female/female headers on the protoboard and the Pi to allow male/male dupont connections. Only need 3: GND, LED, and BTN. Pins 35, 37, and 39 are appropriate. In general, things can be hot glued into place. While I'm messing around, maybe tape is fine, though I do wonder what happens when you let that stuff melt... what am I talking about, it will never conduct.
First look: it seems to fit into this container, with a fair bit of space to spare. I think it's a good size. We'll wait and see once we get the new USB adapters.
Next actions:
After booting the Pi Zero with 3 USB audio devices connected, I'm measuring 98 mA from the battery, around 12.56 V, giving 1.23 W. The LEDs are again distracting, I'm going to have to paint this container too. Tricky in the case of the camera. Maybe I'll mount the camera using the available holes, and attempt to block out the light. Really need those audio cables to show up... Now I'm testing that IR light can transmit properly through the plastic. Looks like regular light can't. So, I'm going to drill a hole in the side for this. That can happen after it's been painted. The Raspberry Pi 3 is going to need a larger container, something to allow some space for the WiFi dongle and the hard drive.
I'm informed that I have 10 days to go. This is beginning to look difficult.
Next actions:
I bought a couple of larger containers, and they seem to be a lot better than what I had before, and also cheaper. I've decided to start installing some of the core software on these devices to avoid getting caught out in the days leading up to deployment. Everything can sit on the 10.1.1.X address list.
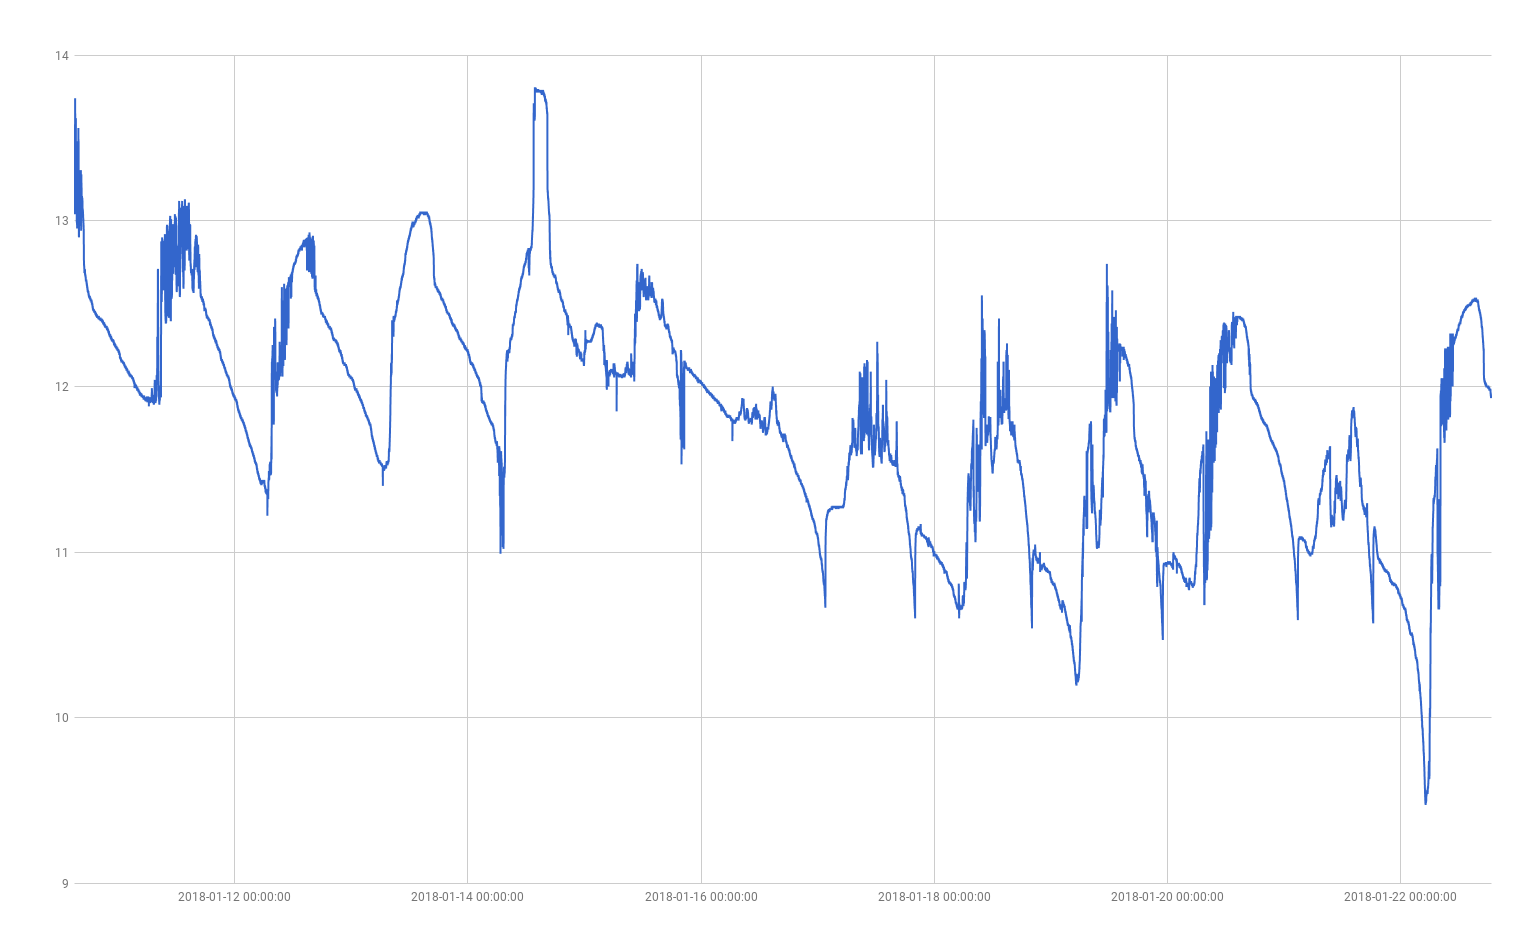
The biggest risk right now is the solar power/storage. I'm not certain that I'm charing the batteries enough. The solar rig seems to have failed. Upon closer inspection, it looks like it hasn't: last night, I felt the power resistor, and it was cold. So, now current was going through it. I felt it just then, and it was hot. Last night, the load indicator on the solar charger was off. Today, it was on. I think the load actually drops out if the battery voltage gets too low. This needs to be tested somehow. Actually, the datasheet seems to suggest that there is some over-discharge protection on the battery which kicks in at around 10.5 V. Let's see if the graph supports this:
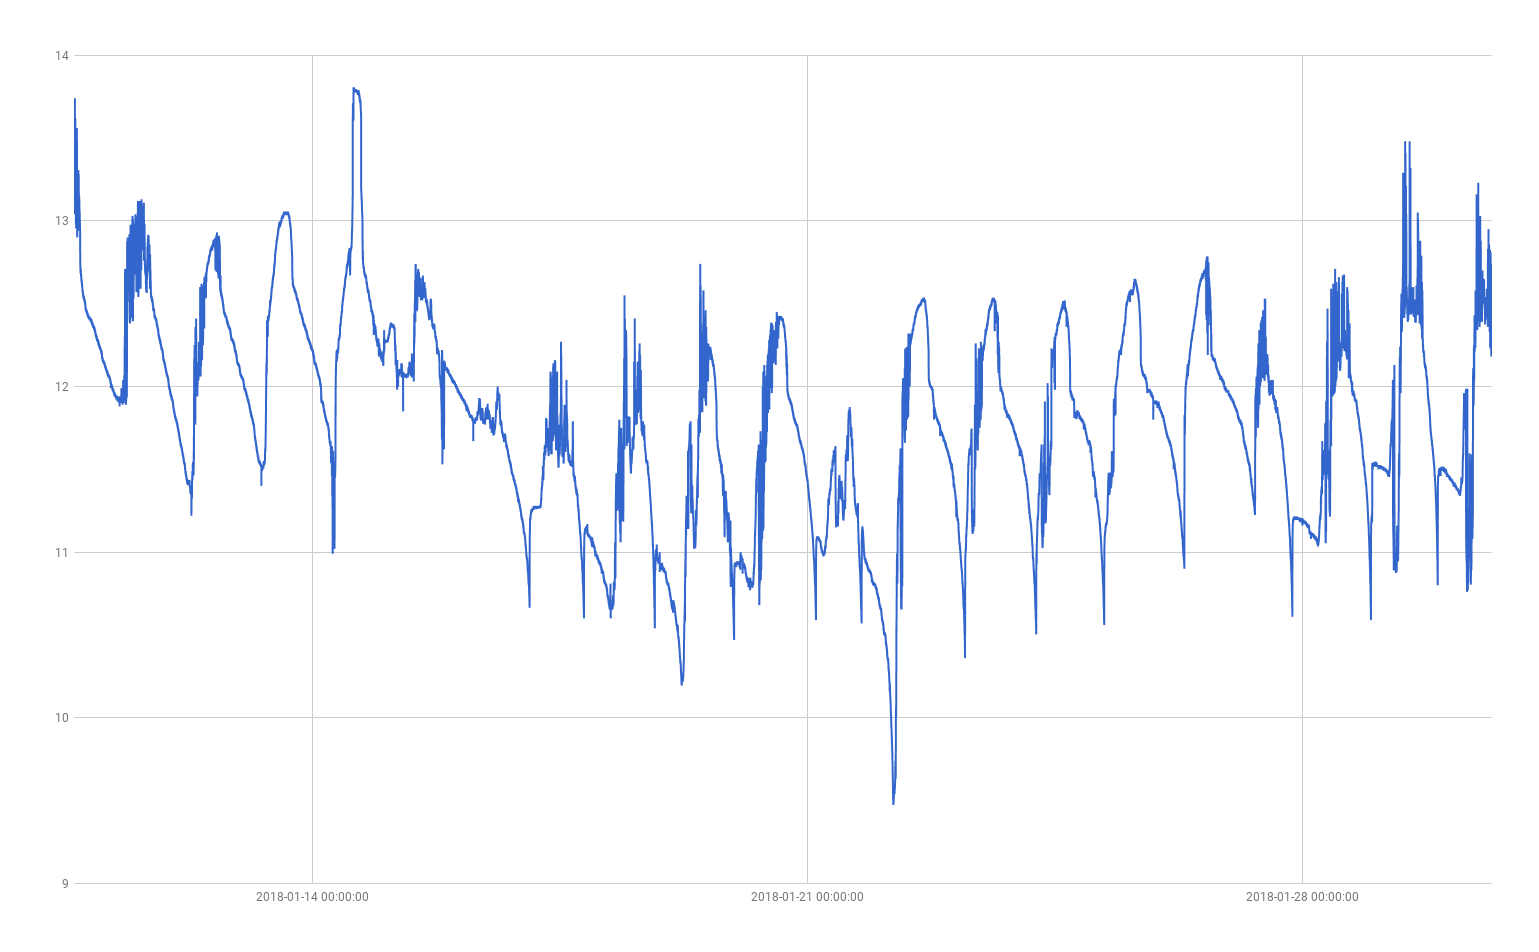
It looks like that 10.5 V cutoff is kicking in by around 10 - 11 pm, and then the device limps on through the night until dawn. I guess I need to increase both the solar collection capability and the battery bank size. This is not good. The solar panel definitely needs to get larger, and it wouldn't hurt to make the battery bank bigger too. At this point, the system is sometimes going without power for 9 hours a night, and that will only get worse through winter. Worst case: 6 - 10:30 powered, 10:30 - 5 unpowered. So, I'm only really getting half the energy. Solar panel needs to be much larger, and then the battery bank might need to follow. I just bought a 200 W solar panel for $125, so that's good. Now, about that battery bank. The good news is that I have loads of spare batteries. The bad news is that they are all untested. Once that solar panel turns up, I'll have a very small window to test it against my maths.
I actually don't seem to have a very large amount of data to recommend the use of 4 batteries, other than rough capacity measuremnts. Having said that, I do actually trust the capcity of these batteries, and I know with a high degree of certainty that I would only be using around 45% of the capacity of 4 batteries in a given day, and only 29% overnight. These batteries should last at least a few months in this configuration. Around $200 is now going towards solar/batteries, I hope it's enough.
I've loaded Zerotier onto all of the nodes. So, the last problems are the power issue (!!!) and the actual construction, which should be fine.
I finally got around to measuring the power consumption of the camera as approximately 0.55 W.
At 7:55 PM I disconnected the power to the resistor. Let's let it charge back up and see how the panel performs.
Next actions:
I suddenly started getting a little worried about gassing in the SLAs, espcially after reading some of this stuff from over east. Some quick bench testing of the CMTP02 solar charge controller showed a float voltage of 14.4 V, which is too high. After scouring the net, I found this German article (which includes a full schematic of the reverse engineered CMTP02) explaining a modification which allowed a custom maximum charge voltage. Trusting it on blind faith, I changed R20 to 8.0 kOhm... and it worked! 13.8 V maximum. Great! While I was in there, I also fattened up some of the traces for higher currents, and bought some new thermal paste on eBay to get a nice seal onto the back.
I just tried testing the IR lamps which arrived yesterday. They seem OK, but the light is definitely partly in the visible spectrum. I will have to run this past the client. This can partially be mitigated by lowering the current. 7.45 V seems to give roughly 0.1 W. I will need to test this at night. I had a look at night, and it's inconclusive without hooking up the camera and looking through that. Way too much effort for tonight though.
Next actions:
I loaded motion onto all the devices. Now I suppose it's time to jump in the deep end and solder some IO on. If I start with the Pi 3, then I won't need to actually get crazy with the headers just yet. I got the Pi 3 up and running with some simple scripts that turned an LED on when an internet connection was present, and off if it was not. I combined this with a button to shut down the Pi, polled each second. Cool! I also managed some range tests for the Pi 3, turns out it can go pretty far. I measured around 50 m, including a few double brick walls. Now I need to try the same test with a 3G dongle. I'm getting at least 50 m range. I think I can ignore any range problems with the Pi 3, but I still need to test a Pi Zero.
I ran into a weird issue where I had modified the /etc/hostname file but not the /etc/hosts file. Watch out for this.
300 mW looks like roughtly the right amount of power to be pushing through the IR floodlights to get reasonable vision over 2 m. This is at around about 8.20 V input voltage, leaving me with plenty of overhead. Bit of a nightmare to tune though.
I also need to begin thinking about battery voltage monitoring, as well as environmental monitoring for temperature, humidity etc. Pressure monitoring could be internal (perhaps) but the rest needs to be external. This website provides some information on how to achieve this.
I just checked over the functional requirements, looks like I'm on track. Light intensity and temperature data are easily attainable through analog measurements using the ADC I set up before, and digital pressure and humidity measurements are probably not too much more complicated.
Next actions:
After a conversation with the client, we've agreed to scrap the weather reporting requirements. The work is high, and the payoff is low. She also reminded me that if we can make the offloading of data easy, then other employees can do it as they pass through. They should be able to connect through WiFi, as long as I can get the main node to sit on a static IP in the network. I'll try this later.
I expanded the headers of the Pi Zeros. Then I tested the range: it seems to be pretty much the same as the Pi 3.
Next actions:
My capacity tester has arrived:
Again using linear interpolation from this website for SoC, at 12.71 V I can assume that the SLA is fully charged. I'll just provide a float/topping charge for 7 hours. I've limited the current t0 1.8 A, which is 10% of the marked capacity, and I'll wait until the current reduces to 4%. C10 for charging, C20 for discharging, so that would be 0.9 A>.
I also boxed up a device. Still to solve: audio cable exits, IR light mounting. Actually, I think I've solved that too. So, just waiting on those audio cables then. Dammit. Meanwhile, I'll spray everything black.
Next actions:
I built the 3 boxes today:
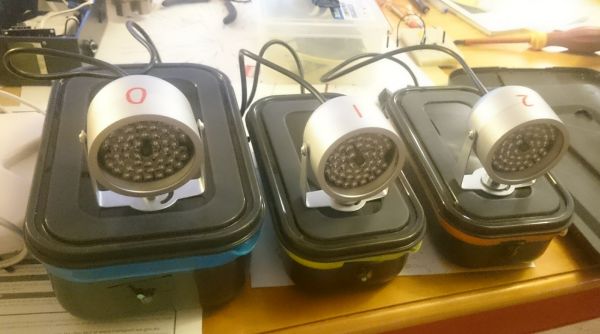
They are still missing their audio connections. I also applied the thermal paste to the solar charge controller. So now I need to actually test and calibrate these boxes. I made a couple of wiring mistakes, but I managed to sort them out. I also test fit the batteries into their box, which was fine.
Next actions:
It makes sense to tackle the relay wiring at this stage. I wrote the code in around 30 seconds, but now it's going to be a little more difficult to test without all my connectors. I managed to find one, and was able to test the relay. No problems! Voltage appearing properly over the terminals. Just did some quick cable calculations to check everything was fine: the voltage drop will be tiny over ~25 m.
Configuring the cameras: I'm going to go for 640x480 30 fps as my default. It's a good compromise of detail and file size. I've enabled picture capture and disabled video capture. In terms of live streaming, I've turned on stream_motion and set the stream_maxrate to 30, but this is more of a debugging thing. Lastly stream_localhost off to allow streaming.
Next actions:
Well, the little audio cables finally arrived. I drilled some holes out using a 6.5 mm bit, but I had to make the hole a little wider to get everything to fit properly. I installed SoX and ran sox -r 44100 -b 16 -t alsa plughw:1,0 test1.wav trim 0 00:10 for microphones 1 to 3, and it all worked fine. Great audio quality actually. For some reason though, I'm having trouble with multiple audio outputs on the Pi 3. dmesg shows that I'm having troubles along the line of this post. I fixed it by connecting the audio adapters directly to the Pi 3, which was very inconvenient. It was probably an issue with the hub, but that's difficult to test at the moment. I'm really not sure what the problem is. The main things I haven't tried yet are putting the SD card into a different Pi, reinstalling everything, and buying proper USB audio adapters. Not really sure which angle I want to take on this yet. I guess the first option is the easiest to try, which would then lead me to the second, and ultimately the third. Dammit.
Next actions:
I tried replacing the hardware, no luck. Doing complete fresh install now.
Creating a new order of events:
/boot/wpa_supplicant.conf to connect to your local network by default/boot/ssh to enable SSHsudo apt updatesudo apt -y upgradesudo rebootsudo raspi-configsudo apt-get install -y libsox-fmt-mp3 soxcurl -s https://install.zerotier.com/ | sudo bashwget https://github.com/zerotier/ZeroTierOne/archive/1.2.4.tar.gztar xvzf 1.2.4.tar.gzrm 1.2.4.tar.gzcd ZeroTierOne-1.2.4make zerotier-selftest and then ./zerotier-selftest to test basic functionalitymake (takes a while to run, maybe an hour)sudo make installsudo ./zerotier-one -d gets the program runningsudo zerotier-cli info verifies that everything is working as it shouldsudo zerotier-cli join [Network ID] joins your networksudo zerotier-one -d runs the service (but see below)sudo cp ~/ZeroTierOne-1.2.4/debian/zerotier-one.service /lib/systemd/system/sudo chmod 644 /lib/systemd/system/zerotier-one.servicesudo systemctl daemon-reloadsudo systemctl unmask zerotier-one.servicesudo systemctl enable zerotier-one.servicesudo systemctl start zerotier-one.serviceTODO: create folders for scripts, copy scripts over, make them executable, edit wpa_supplicant for 3G dongle, load LED/shutdown button scripts, edit crontab (cameras, microphones, shutdown, relay etc)
Still no luck with lsusb... oh man, I finally got it working. I'll link to the solution tomorrow.
Bought a replacement USB hub, it works! Ordered in 100 m of AWG 22 wire for $55, and I found a $299 replacement solar panel and $5 DC jacks which are both available if I require them.
I finally think I have all the boxes and microphones. I configured the cameras. So, the next major thing to fix is the code, and the general workings of the system. In particular, the SCP/FTP/whatever system used for transferring the files. Also, I need to test that the ZeroTier nodes work "correctly" by sending the packets through the simplest/closest path, rather than round the houses through the 3G network. A job for Sunday.
Next actions:
wpa_supplicant for 3G networkingcrontab for cameras, microphones, shutdown, relay control, conversions, file sending, etc.I just plugged all the devices in at once, and it seems to be sitting at roughly 8 W. This seems correct, given that the IR lamps are off. And the power consumption of the main node alone seemed in the order of 6 W. I figured that an easy test for the server system would be to get all the cameras working properly. So, I'll add the appropriate lines to crontab:
@reboot sudo modprobe bcm2835-v4l2 && sudo motion
In terms of getting SCP working, I was having a look at 2017-10-22, and after replicating the steps, it looks like I need to create a key pair. Those instructions were simple enough, and now that works. After setting it up for both nodes, the master can send or receive any file from anywhere.
To get the hard drive working:
sudo apt install ntfs-3g gets the package for mounting NTFS with read and write access. NTFS was chosen to allow Windows/Linux compatibilitymkdir /media/externalhd/ to make the place for mounting the drivesudo mount -t ntfs-3g /dev/sda1 /media/externalhd/ mounts the drive, assuming that it can be found at /dev/sda1I've reduced the frame-rate down to 5 FPS, which seems appropriate. At some point it starts to affect the power consumption, and also the hard drive capacity.
I wrote up a little script to simplify the switching on and off for the slave nodes. So, I've been doing bits and pieces of work all day, but unfortunately I seem to have done little to actually finish the functional parts of the code that I need to complete. I'll need to work on the audio tomorrow. It should be pretty much copied and pasted from the picture code.
I'm sitting a little closer to 9 W with motion running on all of the nodes. We'll have to want and see what recording does to the power consumption figures.
Next actions:
wpa_supplicant for 3G networkingcrontab for cameras, microphones, shutdown, relay control, conversions, file sending, etc.SCP is too slow! I need to speed it up somehow. I wonder how it compares with rsync? Turns out there's no real difference. I thought I noticed an increase in speed by using the chacha20-poly1305@openssh.com cipher, but it wasn't significant. It probably has more to do with the strength of WiFi signal. I'll put them all on the dongle in a second and compare the speed (getting ~30 kB/s at the moment).
My thoughts on the timeline:
I've written the code to turn the slaves on and off, and to record video, and to backup images. So, left to do, ignoring audio processing:
I wrote the code to record an hour of audio as record_audio.py. crontab now looks like the following:
@reboot python3 /home/pi/ui/check_connection.py

@reboot sudo modprobe bcm2835-v4l2 && sudo motion

#@reboot sudo mount -t ntfs-3g /dev/sda1 /media/externalhd/

0 19,20,21,22,23,0,1,2,3,4,5,6 * * * python3 /home/pi/audio/record_audio.py 1

0 19,20,21,22,23,0,1,2,3,4,5,6 * * * python3 /home/pi/audio/record_audio.py 2

0 19,20,21,22,23,0,1,2,3,4,5,6 * * * python3 /home/pi/audio/record_audio.py 3
There might be a more elegant way to do that later, it will do for now. Now I need to put this code on all of the devices so I have some audio to play with tomorrow. After remembering to include the code to kill the last process, that's also done. So, now I could compress the audio files on the main node. Code written, as well as compressing the slave nodes. I've also written code to delete the old audio files after converting. So, now I need to write code to transfer the files over from the slave nodes. I'm going to foce them to connect through the 3G node now, otherwise it's going to be so slow.
Pro tip: you can use sudo systemctl daemon-reload && sudo systemctl restart dhcpcd to restart the WiFi wpa_supplicant stuff.
The good news is that the data travels really quickly between the nodes now. The bad news is that I'm going to need to transfer the data incrementally throughout the day. If I only try to transfer files that are bigger than 300 MB, and do this every hour, then I should be OK. This is a job for tomorrow though.
There's also a weird problem where 10.1.0.11 won't record.
Next actions:
crontab for microphones, shutdown, relay control, conversions, file sending, etc.SCP is fine, crontab was adjusted to actually work properly, a bunch of code was written, the recording problem with 10.1.0.11 was fixed (turns out it was in the wrong timezone...) and most stuff works. I now have 2 solar panels, and am looking forward to a full system test tomorrow night. So last minute. Oh well.
Next actions:
The recording problem for 10.1.0.10 seems kind of fixed. I can't tell exactly what's going wrong, but I think my temporary fix at least picks up on most hours of audio. I'll leave this in as an ongoing problem. I think it has something to do with running subprocess.call() on a 4 core system.
Next actions:
Well, there's a lot to talk about. The system was deployed. Unfortunately, the WiFi failed and was unable to bridge the gap between the nodes, so only the main node was deployed. It has since captured over 100 000 images and 179 hours of audio, already. Now I am searching for proof of life on the node in terms of audio and imagery. Audio first. I'll compress a likely audio sample and bring it home.
I've run sox /media/externalhd/0/1/2018-03-10_04_00.mp3 -r 8000 2018-03-10_04_00.mp3 to compress some audio to bring home. This brough it down to 3.1 MB. Still a ~9 minute transfer at ~6 kB/s. Much better to do the file transfer from another Linux device, since when the transfer stalls on FileZilla it tries to start from scratch. Damn, the file doesn't sound good. It also looks way too short. I can't hear anything interesting in the first 10 minutes.
Next actions:
I'm not hearing much bird sound at 4am, which is supposed to be the noisiest time. I've been using:
ssh pi@10.1.0.10 sox /media/externalhd/0/1/2018-03-12_04_00.mp3 -r 8000 2018-03-12_04_00.mp3

scp pi@10.1.0.10:/home/pi/2018-03-12_04_00.mp3 .
...and then using FTP to move the file back to me to listen to it. I'm tempted to put this in a cron file for my server. 3 MB per day is nothing. Having said that, waiting isn't so bad. Anyway, no audio was detected at 4am on the 8th, 10th, or 12th.
Next actions:
I still haven't heard a bird, and I'm sure the hard drive is starting to fill up with bird images.
pi@breaksea-pi3:~ $ python3 report/generate_report.py

generate_report.py: Generating report...

generate_report.py: 13 days.

generate_report.py: 161 files in microphone 1

generate_report.py: Last (?) file: 2018-03-19_07_00.mp3

generate_report.py: 161 files in microphone 2

generate_report.py: Last (?) file: 2018-03-19_07_00.mp3

generate_report.py: 160 files in microphone 3

generate_report.py: Last (?) file: 2018-03-19_07_00.mp3

generate_report.py: 224773 images in total.

generate_report.py: Last (?) file: 227-20180307154021-03.jpg
As can be seen, I'm gathering a lot of images. du /media/externalhd/0/img -h says that I'm gathering nearly 0.5 GB/day. This clearly needs to be fine tuned at some point. In the meanwhile, I need to hear a bird.
I've also been hearing weird buzzing sounds. It might be time to listen to a minute of uncompressed audio as a test: sox /media/externalhd/0/1/2018-03-19_04_00.mp3 ~/2018-03-19_04_00-01.mp3 trim 0 01:00 should do the trick. I had a listen, and I can hear white noise, and what sounds a lot like the ocean, but no birds. Trying an earlier 10pm recording (2018-03-08_22_00.mp3)...nope, sounds empty. I'm going to need to refine the audio characteristics of the bird, and then run a bandpass filter over the lot, and try to run some kind of adaptive peak detection to help me find an audio clip. This could actually work. Find the top 10 loudest sounds per hour, package the whole lot up. Time to write down the process:
I've also been doing a little bit of thinking with regards to the cases. I think that Pelican cases are great:
They're waterproof, shock resistant cases that come with foam and can take a beating. They also seem to be standard across many industries in Australia. I think this is probably the future of the product. The foam it comes with will be really handy for mounting everything too, but might pose problems in terms of heat dissipation. I just found the following command to get Raspberry Pi heat: /opt/vc/bin/vcgencmd measure_temp, and my current deployed Pi is sitting at a not-so-cool 72 C, while the one on my desk is 34 C. I'm glad I decided to move the busy work to the morning rather than midday. This would be worth plotting over time: done. Let's check back in a few days. Anyway, back to the cooling problem: maybe I don't have one? I think I should try first, and then see if there's an issue. Certainly, mounting stuff in foam could create issues. But it would be so convenient... Maybe all the hot stuff can be attached to the very bottom of the case, and I could experiment with an aluminuim heat exchanger. I had a look into thermoelectric case coolers, but they are expensive, overpowered, and contain moving parts.
I had a look at the spectrum of some example audio sent by the client:
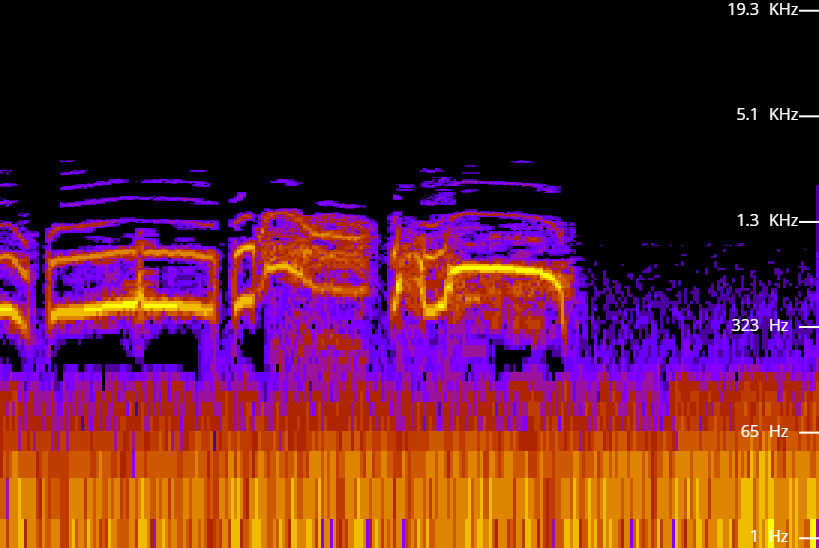
The bulk of the audio information seems to be between 300 Hz and 2 kHz, with a very small amount of even higher frequencies present. It almost looks like a highpass filter would be enough, with a cutoff of around 300 Hz.
Next actions:
Time to take matters into my own hands. I need to get some filtering happening. Let's just start by bandpassing an hour and picking the 10 peaks, saving the audio, and packaging them up to bring home. A long process, debugging over this distance...
Error after error. I'm now rewriting my code in python 2.7 since pip3 seems to have given up. What a ridiculous situation.
Starting the task of rewriting for Python 2.7. I got as far as here before a more difficult error:
pi@breaksea-pi3:~/processing $ python process_wav_5.py

process_wav_5.py: Starting...

process_wav_5.py: 1 files to process.

process_wav_5.py: Processing mp3/2018-04-01_04_00.mp3 into wav/2018-04-01_04_00.wav at 8k...

sox WARN rate: rate clipped 15 samples; decrease volume?

sox WARN dither: dither clipped 13 samples; decrease volume?

process_wav_5.py: Filtering...

process_wav_5.py: Detecting peaks...

Traceback (most recent call last):

  File "process_wav_5.py", line 82, in

    peak_indexes = detect_peaks(new_wave, peak_height, frame_rate)/frame_rate #in seconds

  File "/home/pi/processing/detect_peaks.py", line 94, in detect_peaks

    dx = x[1:] - x[:-1]

MemoryError
The implication is that the detect_peaks.py code only works with more RAM. I've tweaked the code, and increased the swap file size to 1 GB. I ended up using around 350 MB of swap, as well as 1 GB or RAM. However, it was able to perform the filtering.
Picking up after a long break. My techniques aren't working. I'm going to compare the sound of birds to the sound of rainfall to see if it shows me where I'm going wrong.
Here's the bird audio:
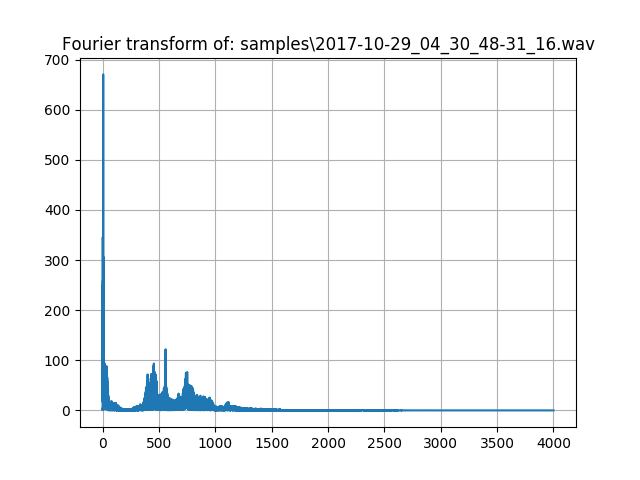
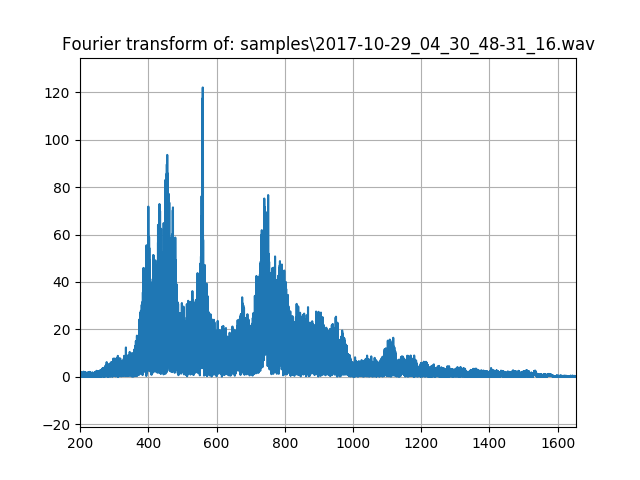
This seems to show that most of the data falls between 200 and 1200 Hz. But we already knew that. I'm thinking of a new process:
I tested this process, and it was successful. I got a script working, but it's going to take a week to run. Here goes nothing.
Next actions:
I've found some bird sounds! At last. But I need to check why it didn't find the sounds at 31:32 on 2018-03-18 4:00
There's a weird in-between balance. Now I'm picking up too much impulse noise (wind etc). I need to compare some quiet calls around the time above, to some loud calls, to some impulses, to silence. A job for tomorrow.
It really shouldn't be that hard to spot the difference:
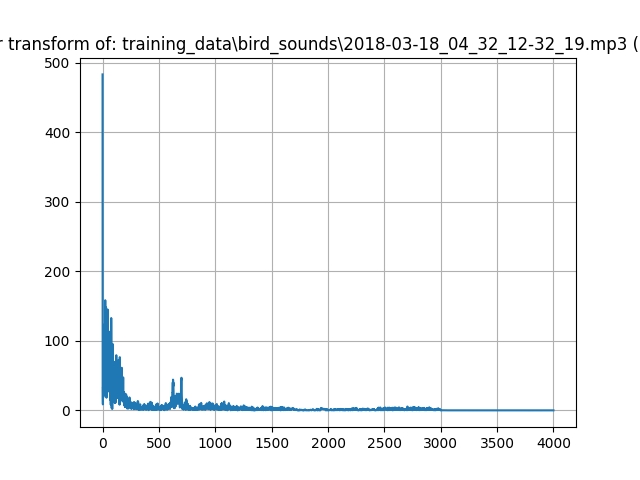

Maybe I need to normalise the recording first, and scale it all so that the peak of the data is '1'. I did that, and it worked pretty well. I also took out all the records with average power too high. This was somewhat successful, but could do with some work. I made a mini database of testing data for validation, and I can use this to test accuracy.
So, this system doesn't work properly. I'm going to start fresh with a new approach: Ornithokrites on Guthub gives a good flow diagram. It's unfortunate that I can't throw out the low frequency data... Or can I? Let's make some new tools. I think I need:
Starting at the beginning, I wrote audioFile1.py. It works well! So now the rest of my code can assume wav files rather than except them all the time. iterateWavAudioFilesinFolder will go through all the audio files in a folder, and turn them into wav files, then return the list of file names. That's enough for today.
I also need to check out higher quality connectors and ditch the telecoms after a conversation with the client.
Next actions:
It's been a while. I bought a new box, which should arrive sometime around the middle of 2018-10, and I did actually end up making that program, for the most part. I want to upgrade it now, so that it utilises machine learning. I'm going to perform a Fourier transform on the input, and then regularise it so that the number of inputs into the NN is consistent, regardless of the bitrate of the audio recording (8k to 44.1k). Then I'll sample 1 second intervals, and let the NN work out if bid audio is present. I should be able to make a program to train it (slowly) in realtime, though it might take days to label a decent amount of data. Oh well, I guess it's required.
Next actions:
Just got the box, and am working with what I have. I think I'm going to use the hard drive, record lower quality audio (say, 8k) which I may be able to compress on the fly, record from 3 microphones... I'm going to need the good marine grade connections still, and I think I'll use the same method as last time for the audio cables. I'll use a nice USB hub to clean it all up, and maybe I can get a WiFi hotspot working according to this tutorial. Earlier today, I also managed to get an IP camera working, which can connect to WiFi networks, hence this effort. It works! Easily.
OK, I'm going to throw this together now. Here's a picture of my rough idea:

Couldn't get Zerotier working over the top of the WiFi hotspot, I'll ignore it. Using apt-get install ntfs-3g, I had to change the way the hard drive was mounted for some reason. Looks like I had done it before but forgot to make a note: sudo mount -t ntfs-3g /dev/sda1 /media/externalhd/.
It looks like the camera I'm now using draws 4.2 W with the IR floodlight on and 1.4 W with the floodlight off. This is probably too much power, given that my old power consumption figure was 8 W with 6 W from the main node. Maybe I need to perform some real-world tests with everything plugged in, just to see. I'm installing motion again, since this tutorial promised that I could get it to work. I did, with help from this tutorial to get the rtsp link working. Tricky little things.
I'm trying to fix the weird RaspAP WiFi dropout. I switched the encryption type to CCMP. Here's to hoping. I'll check dmesg tomorrow morning.
Next actions:
dmesg to see if WiFi is fixedmotionThe WiFi seems to have been fixed. For the RTC, I wired it up as described, but my cheap DS1302 didn't work. I tried replacing it, no luck. Then I started looking at ways to update the time from the attached phone, but this proved tricky. I basically need either an NTP server, or an RTC. The RTC is probably easier to be honest. After an embarassing amount of work, I think I give up on this. I ended by screwing up my sudoers file, and am going to have a break.
Next actions:
motionJust doing some quick calculations: 4 * 7.2 Ah batteries gives me 28.8 Ah, so a 10.5 W load will draw 0.875 A at night, which whould be plenty of spare. A 12 hour night would only drain about a third of the battery, I think I've got plenty of spare there.
FOr the time being, I'll set the time by shelling in and manually setting it. Job done for the moment. I might add an RTC later.
Our budget has been expanded, so I can afford to buy stuff locally if I need.
Now, time for a fresh install. While that's going, let's run through the order of instructions:
/boot/ssh to enable SSHsudo apt updatesudo apt -y upgradesudo rebootsudo raspi-configsudo apt install -y libsox-fmt-mp3 soxwget -q https://git.io/voEUQ -O /tmp/raspap && bash /tmp/raspapmotion and configure itNext actions:
motionI did some recording on the microphones using sox -r 44100 -c 1 -t alsa plughw:1,0 test1.wav trim 0 00:20 rate 8000. This records 1 channel audio through the first microphone/USB adapter for 20 seconds at 44100 Hz, as per standard, and then downsizes it to 8000 Hz. That would give me a bitrate of 128 kbps, which is 16 kB/s, which is 57.6 MB/hour, which is 691 MB per 12 hour day. I think that's a bit too much. If I halve my bitrate, I can get an mp3 compression at 44100 Hz. Which would mean a rough total of 1 GB per day of audio. Probably exactly the same as what I did last time. A little worried about CPU load, again. Maybe I can drop that to 16000 Hz, and see what it sounds like. Getting a lot of mains hum at the moment. I'm also worried about the CPU load imposed by mp3 conversion on the fly. I tried it, and CPU loading is not the issue. Apparently there are problems with recording from 3 microphones at once. I need to work out why they are interfering with each other.
Next actions:
motionBack into it. It sounds like I'm not having any issue with recording from multiple microphones IF I'm connected directly to the USB port itself. I'm going to try to repliciate the issue using a USB hub. I couldn't replicate it on a Raspberry Pi 3 B+, I'll try on a Pi Zero W. On the 3B+, recording from 3 channels seems to use around 10-15% of CPU. On a Pi Zero W, it uses around 75-80%. It also resulted in some audio degradation. There are a few reasons that I'm not going to use the Pi Zero: it's going to be overworked, I will lose audio quality, and I will have a hard time conecting my portable hard drive. I'm now using a command more like sox -c 1 -t alsa plughw:3,0 test3.mp3 trim 0 01:00, which does record at 48000 samples, but I think that I'm just going to keep it native.
Getting the hard drive working:
sudo apt install ntfs-3g -ysudo mkdir /media/externalhd/sudo mount -t ntfs-3g /dev/sda1 /media/externalhd/This works fine, but it doesn't survive a reboot. I'm just going to have to do this manually for the moment, and I'll work on a script later.
Current jobs required on reboot:
sudo mount -t ntfs-3g /dev/sda1 /media/externalhd/date --set="20170413 21:14"I set up some code to record the audio from a particular microphone, and then I editied crontab so that it was able to record automatically. I think that this time I'll record 12 hour audio, and deal with it in post-processing.
Next actions:
motionNext, I realised that I needed to get this hotspot running again to allow file transfers to occur, so I installed RaspAP again. I wanted to also test if I could host a network and connect to another (turns out that I can't, unless the network I'm connecting to is ethernet). I ended up cancelling the nights recording in order to test RaspAP, since the audio seems to work correctly. I should note, however, that I am getting a lot of noise in the recording. I hope that it is an issue created by the mains power.
I followed my old RaspAP setup instructions. It turns out that you also have to delete all the WiFi connections if you want to use it as a hotspot. More experimentation required here. This will do for the moment at least.
So, now that it has WiFi, I need to work out a simple system for downloading the files. The best way would be if you could simply click on the ones you wanted somehow. Turns out that I can easily do that with the download tag, but I need to make sure that www-data has access to that particular file/folder. To make it work I did the following:
sudo ln -s /media/externalhd/1 test_folderwww-data: sudo chown -R www-data:www-data test_folder
I set up 3 symbolic links, one for each of the microphones, and changed the ownership. Working flawlessly! I can't easily download multiple files, so what I think I will do is set up a cron job that runs at 8 am each day which just zips up all the files. I installed zip, and by zipping them with zip -r /media/externalhd/1.zip /media/externalhd/1/, I am able to download them later. It takes around 1:45 minutes to add a 330 MB file. Using zip -ru0 /media/externalhd/1.zip /media/externalhd/1/ I was able to bring that down to around 40 seconds (no compression), and also only update the archive by adding the latest file. I think that is enough options: download all the files, or download just the one you want.
Next actions:
cron)motionI bought a waterproof connector. It is apparently a DEUTSCH IPD USA DTO4-2P. Mouser tells me that it has IP68, so I think I can trust it. Looks pretty complicated to actually install. There are resources online which can help explain things. My plan is to drill out a large hole, and then silicon in the female conenctor. I'll have to build the male connector out on site, unless I can think of another way. As a last resort, I could use simpler terminals... I'm so sure there is an easier way. The main problem is that in order to maintain the seal, I don't want to drill holes while on site. I reckon I can easily do this with pliers.
Next job: zipping and displaying files. Well, that all works now! Some simple PHP that took less than 30 minutes. I can download the zip files, and listen to the audio of particular files. It might be good to include a download button just to the right too. I need to rethink file naming, and I'm not sure about my directory layout. I'm going to switch to {microphone}-{date}.mp3" format for the audio files when they are downloaded. I'll keep them in folders 1, 2, and 3, but I'm going to rename the zipped folder to "zipped". This will keep me sane.
Just because I want to, I will add a little summary page in future.
I added the cron job for the compression, we'll see how that goes.
Next actions:
cron is zipping correctlymotionThe zipping worked correctly.
My biggest worry now is that the recorder will impose too much load on a little buck converter. I have had occasionally had problems with this in the past. I've installed stress, and by using watch -n1 /opt/vc/bin/vcgencmd measure_temp, I can impose CPU loads (stress -c 1) and measure the response:
The power supply is pretty marginal. Drawing 400 mA with the combined load of the hard drive, it's struggling a little. Hopefully it can survive some stress tests too. At full stress it is drawing around 480 mA. So, most of the load must be the hard drive. The little black USB cable I was using seems to negate any voltage drop issues I was experiencing. So, the end of the story is that my power components should be fine.
I'm going to try to put everything into the box now. I cut the hole for the DEUTSCH connector, and chiseled it square. Unfortunately, I misplaced it. I think I can work around that for the moment. I also drilled holes for the audio connectors. In future, I'd like a power switch, but I can deal with the RaspAP shutdown switch for the time being. Then, I used kitchen/bathroom sealant to waterproof the holes. Now I'm just waiting for it to dry.
I had a go with the webcam, and was able to connect it to the Pi, as before. A reminder: ethernet is your friend when WiFi is acting up. Now I need to hook it up to motion like I did before. Unfortunately, I didn't take as many notes as I should have, so here we are at square one. Well, not quite. I know the software exists, I just need to know the name. Turns out it was Xeoma, and I found the camera with it at rtsp://10.3.141.81/11 or /12.
motion configuration:
- daemon on
- framerate 30
- netcam_url rtsp://10.3.141.81/11
- netcam_userpass admin:admin
- output_pictures off
- stream_motion on
- stream_maxrate 30
- stream_localhost on
/etc/default/motion: start_motion_daemon=yesIt works! Took a bit, but got it done.
Next actions:
Finally got around to fixing the external hard drive. It's all in this fstab explanation. Basically, after working out the UUID, and choosing a mount point and file system, you can set /etc/fstab: UUID=5C487D60487D3A3A /media/externalhd/ ntfs-3g defaults 0 0. It worked on the first boot.
I also wrote some code to log the temperature of the device, which is logging to /media/externalhs/logs/temperature.csv.
I had a think about the power budgeting. I think that I'm sitting at around 10 W, which might put a bit of load on the batteries, but will probably be OK. I really need to do some testing on that front. I wonder if it's too late to do battery voltage logging... I think it's unecessary complication.
I think the webcam is capable at this resolution. I'm going to try to keep it that way I think. I'll need to do some calibration with moving plants etc.
I put the webcam link and the temperature on the website. I don't think I'll bother with this audio summary information. We're nearly done! I've saved all the files so far, and here's a copy of crontab:
	#Record the temperature

	* * * * * python3 /home/pi/logTemperature.py


	#Record from all the microphones

	0 19 * * * python3 /home/pi/recordAudio.py 1

	0 19 * * * python3 /home/pi/recordAudio.py 2

	0 19 * * * python3 /home/pi/recordAudio.py 3


	#Zip all the files

	30 7 * * * zip -ru0 /media/externalhd/zipped/1.zip /media/externalhd/1/

	30 7 * * * zip -ru0 /media/externalhd/zipped/2.zip /media/externalhd/2/

	30 7 * * * zip -ru0 /media/externalhd/zipped/3.zip /media/externalhd/3/

	30 7 * * * zip -ru0 /media/externalhd/zipped/images.zip /media/externalhd/images/
Next actions: